LeadCenter offers innovative features for financial advisory companies to streamline their daily operations. These features include setting up insurance products, insurance companies, product types, and much more.
Let’s see how you can configure these settings:
Step-by-step instructions
To configure Insurance Products for your account, follow these steps:
- Log into your LeadCenter account.
- Click on your user initials in the navigation sidebar on the left and select Setup from the options.
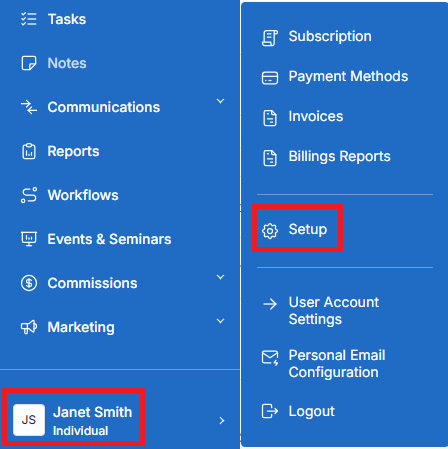
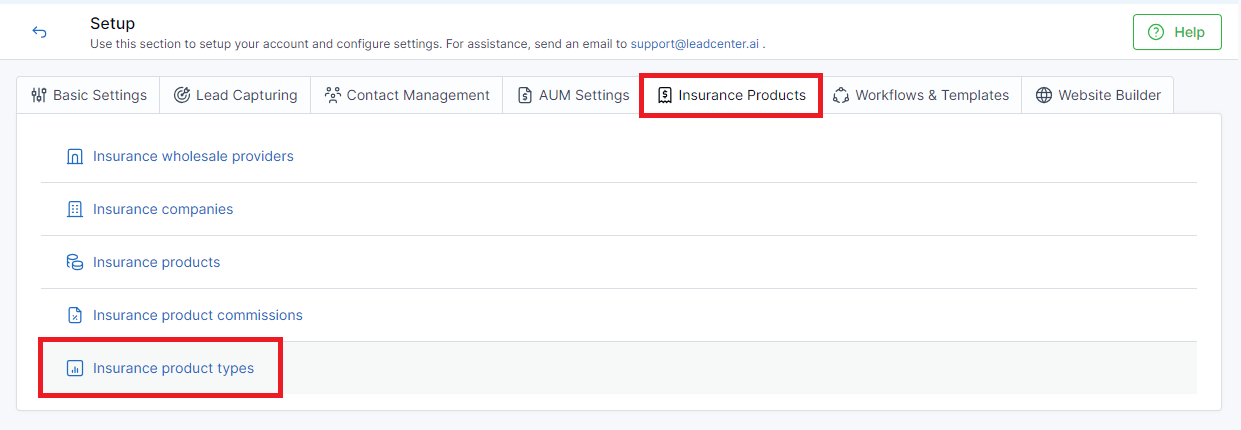
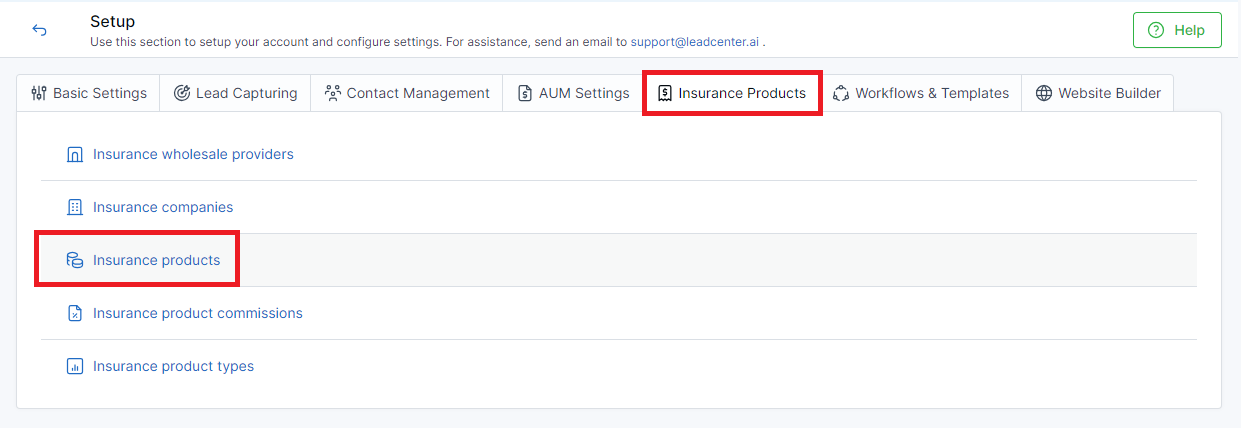
- Navigate to the Insurance Products tab.
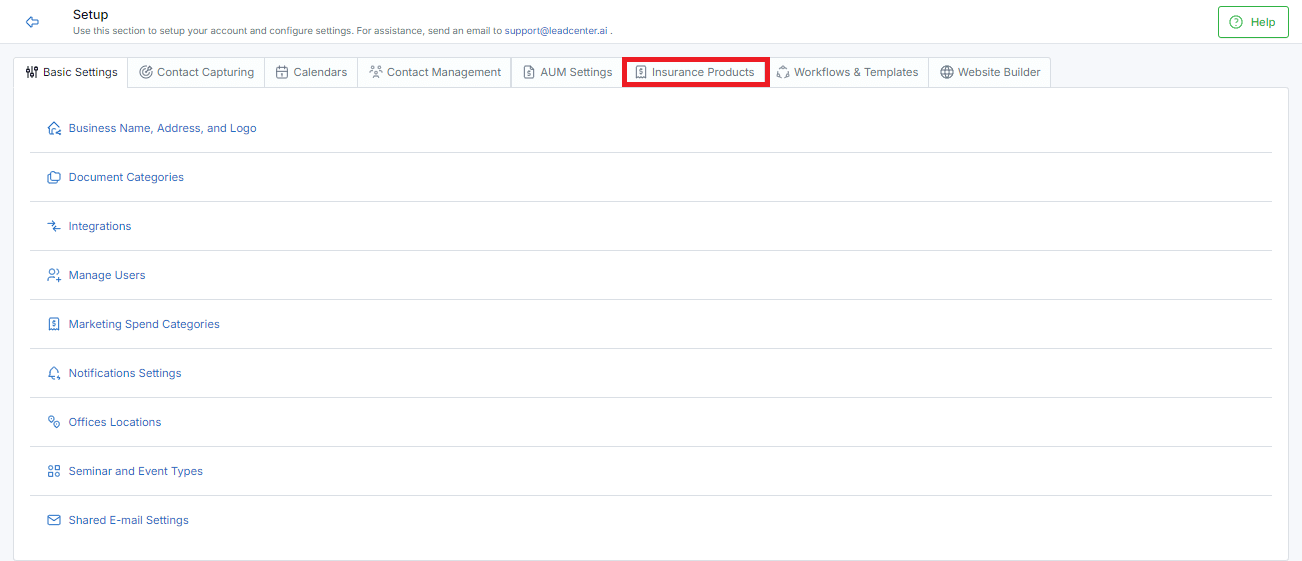
- Go on to configure insurance products as required.
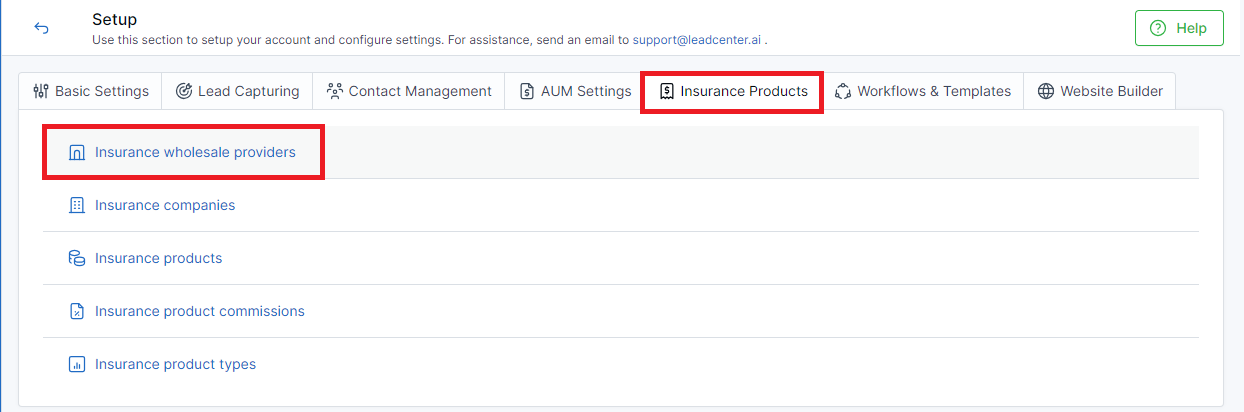
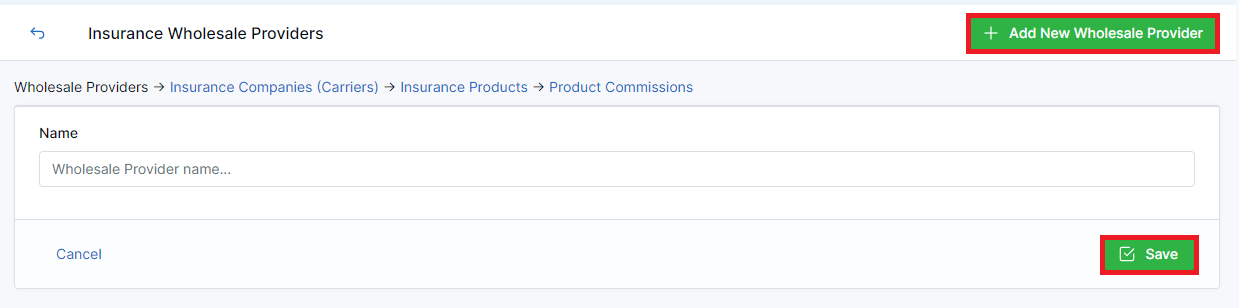
Configuring Insurance wholesale providers
- Click on Insurance wholesale providers in the Insurance Products tab.
- Click Add New Wholesale Provider button on the right side.
- Write the name of the required wholesaler in the Name field.
- Click Save to proceed or Cancel to go back.
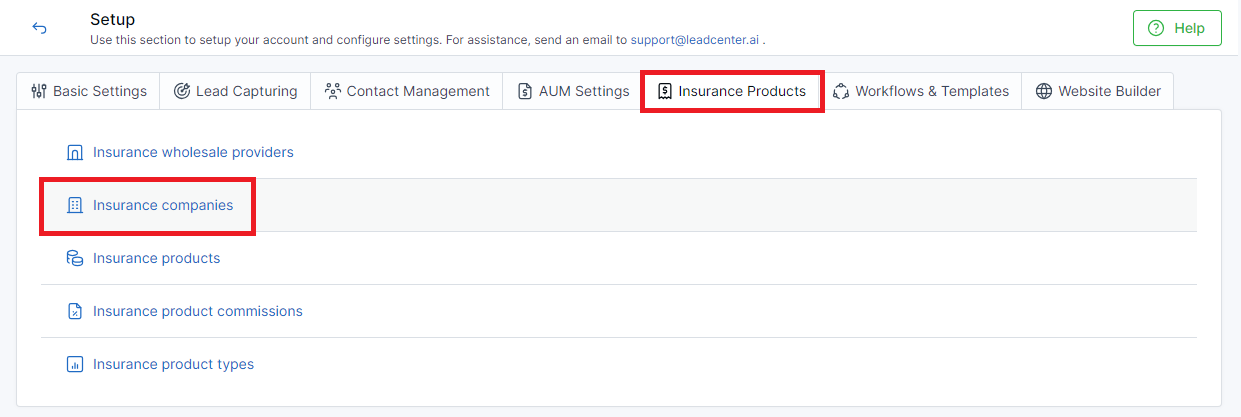
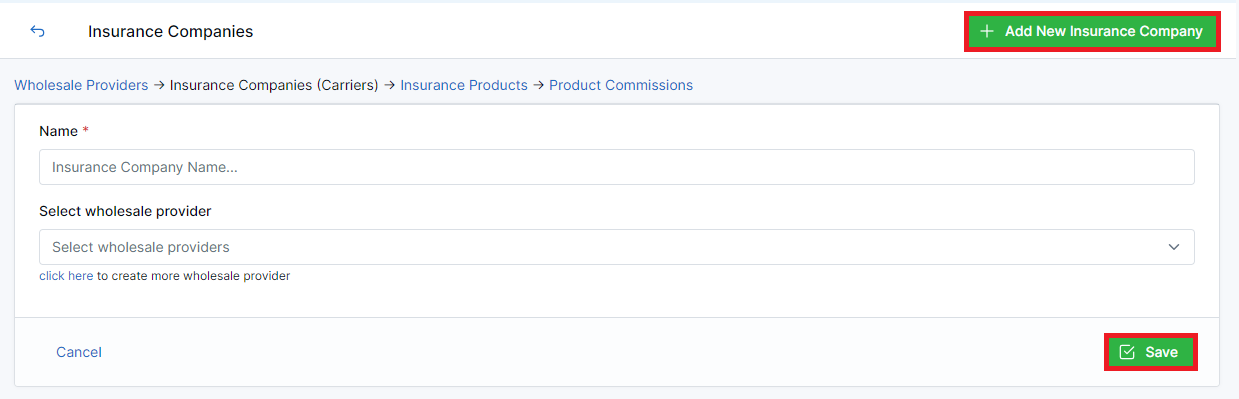
Configuring Insurance companies
- Click on Insurance companies in the Insurance Products tab.
- Click Add New Insurance Company button on the right side.
- Write the name of the required insurance company in the Name field. Note: This field is mandatory.
- You can use the already configured information for the Select wholesale provider field.
- Click Save to proceed or Cancel to go back.
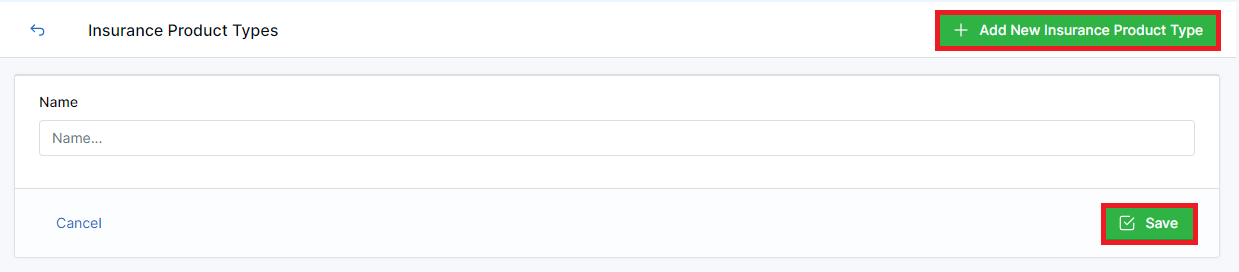
Configuring Insurance product types
- Click on Insurance product types in the Insurance Products tab.
- Click Add New Insurance Product Type button on the right side.
- Write the name of the required insurance product type in the Name field.
- Click Save to proceed or Cancel to go back.
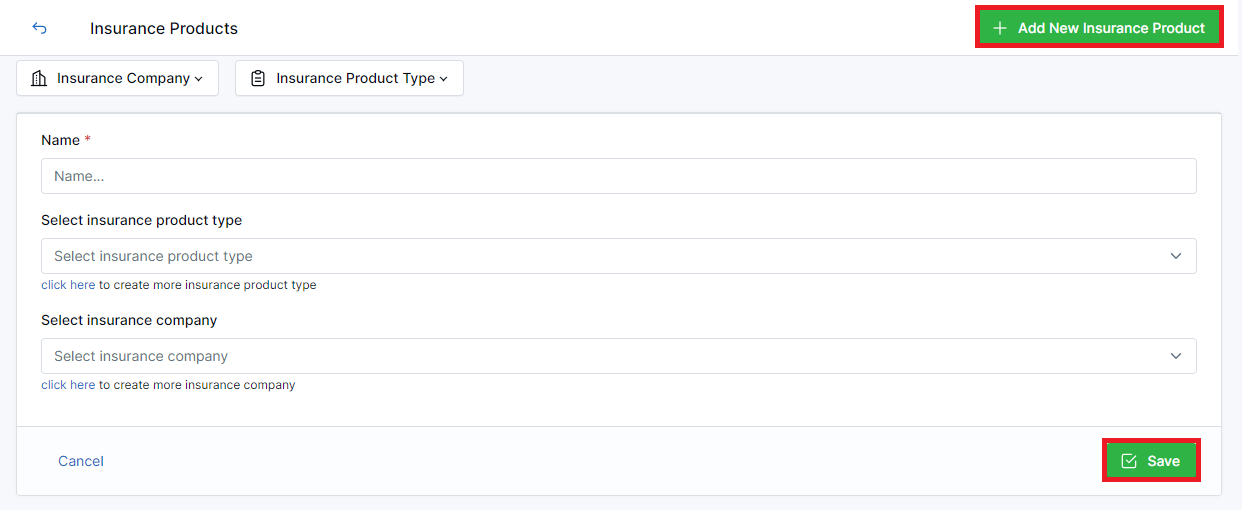
Configuring Insurance products
- Click on Insurance products in the Insurance Products tab.
- Click Add New Insurance Product button on the right side.
- Write the name of the required insurance product in the Name field. Note: This field is mandatory.
- You can use the already configured information for the Select insurance product type and Select insurance company fields.
- Click Save to proceed or Cancel to go back.
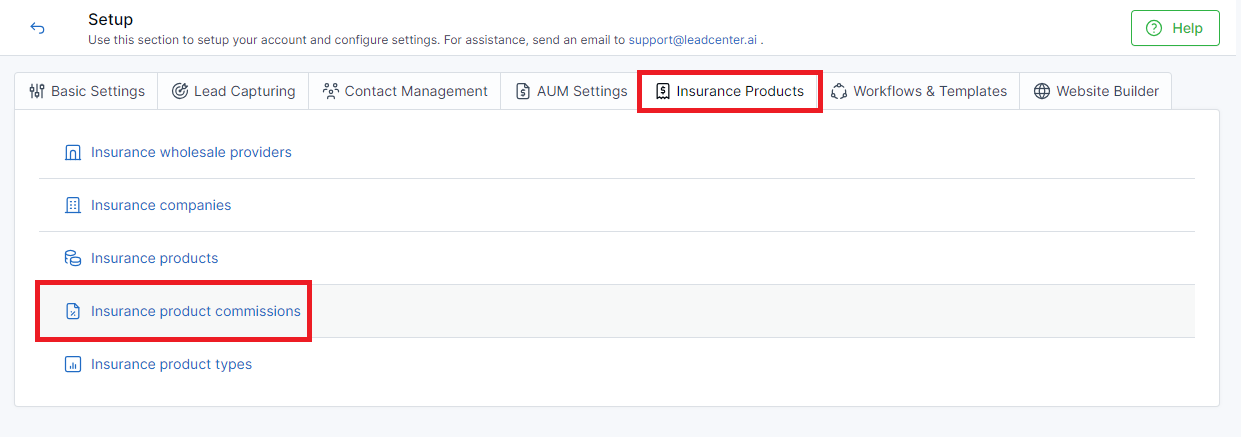
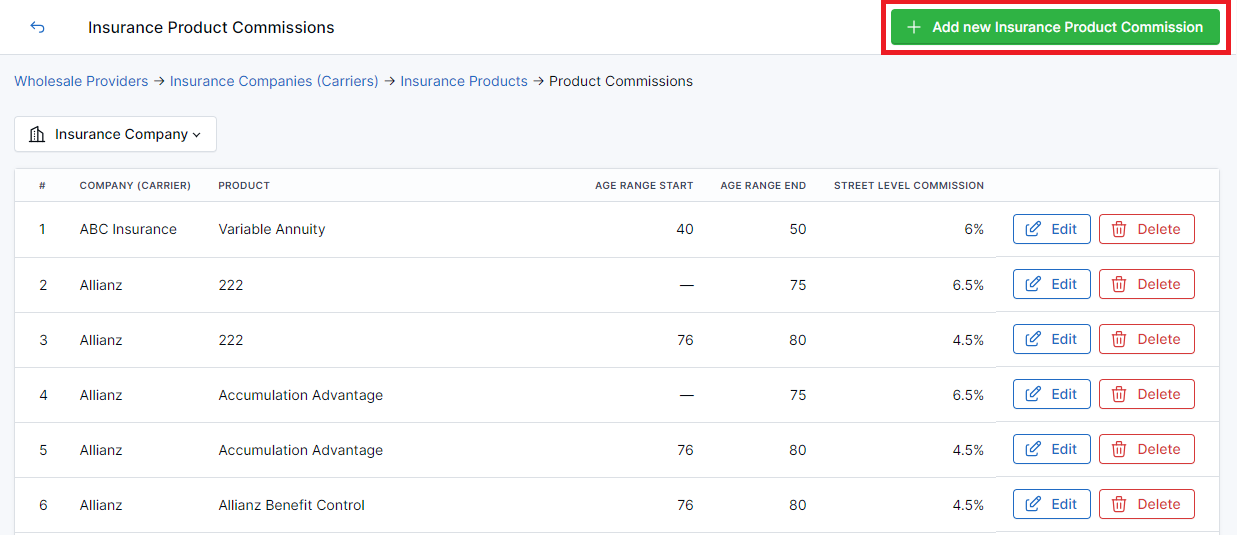
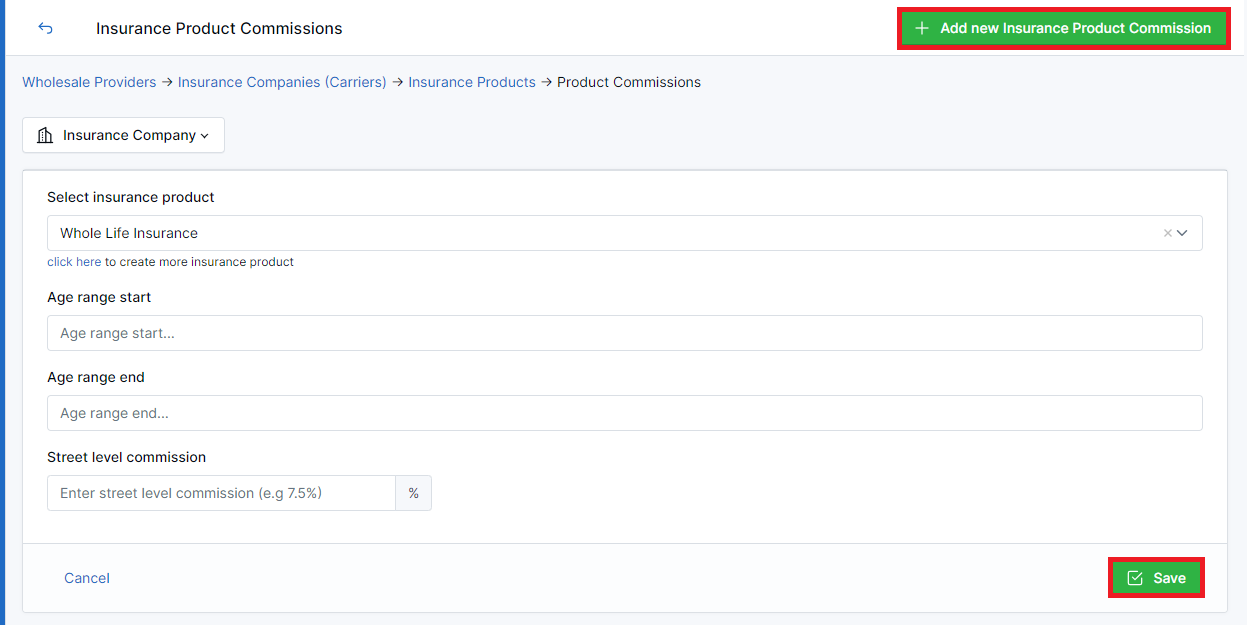
Configuring Insurance product commissions
- Click on Insurance product commissions in the Insurance Products tab.
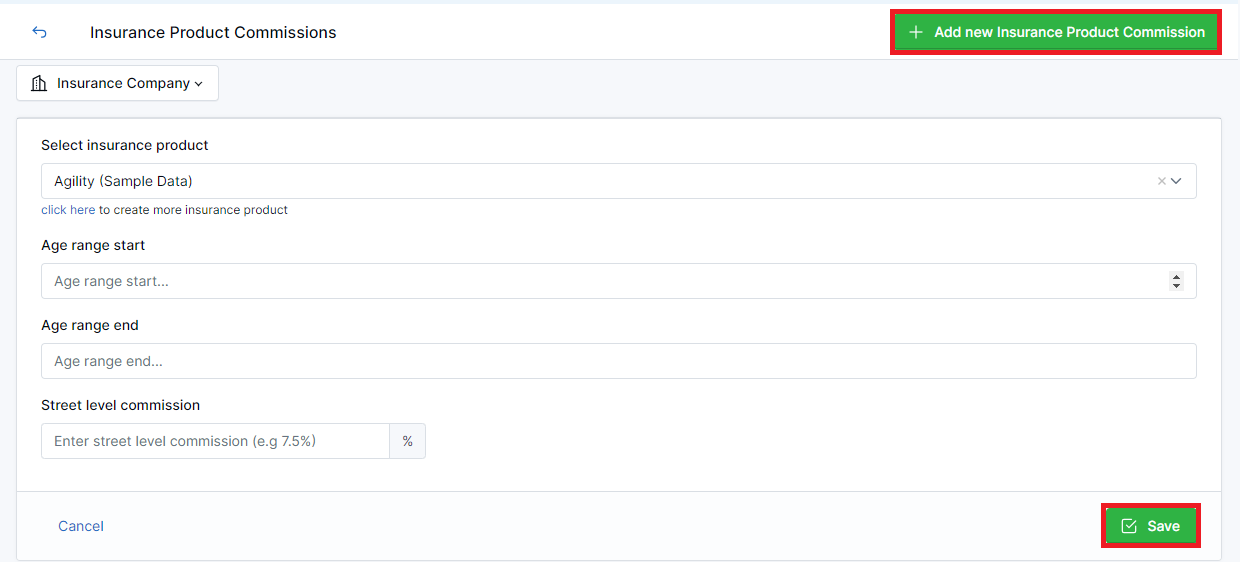
- Click Add new Insurance Product Commission button on the right side.
- Go on to fill out the relevant information in the following fields:
- You can use the already configured information for the Select insurance product field.
- Set up the age ranges for Age range start and Age range end fields.
- Set up the street-level commission for the insurance product in the Street level commission field.
- Click Save to proceed or Cancel to go back.
LeadCenter is an advanced lead management suite that is purpose-built for financial advisory companies. It offers innovative features such as configuring lead accounts, adding writing advisors, setting up AUM and insurance products, and much more. The Setup section of LeadCenter enables you to configure these settings when you first set up your account and enables you to start your journey on the right foot.
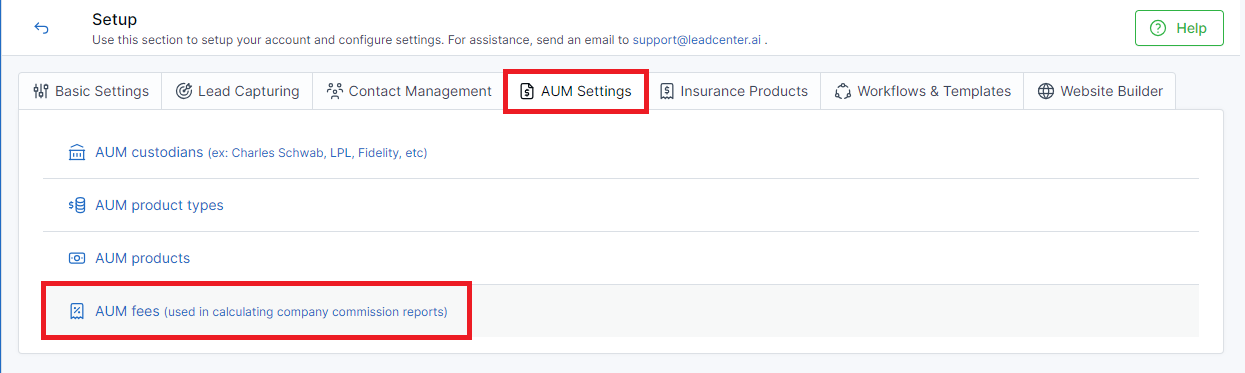
Let’s configure AUM settings:
Step-by-step instructions
To configure AUM settings for your account, follow these steps:
- Log into your LeadCenter account.
- Click on Setup in the navigation sidebar on the left.
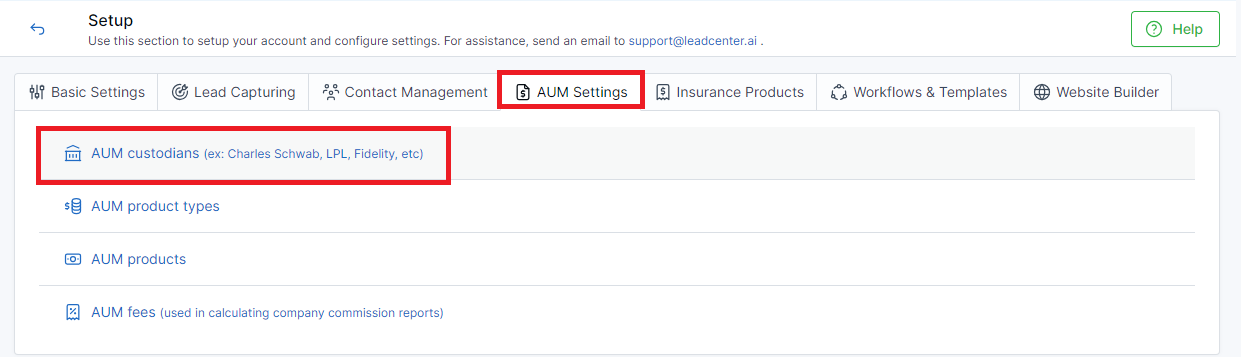
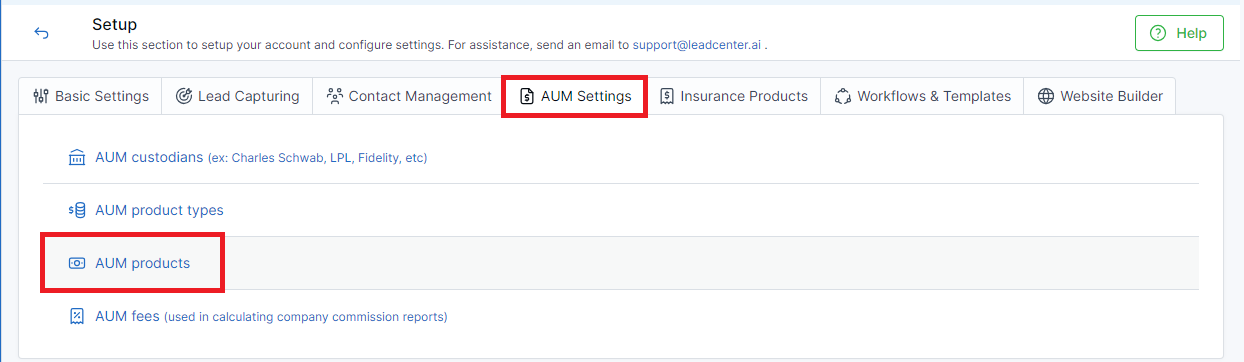
- Navigate to the AUM Settings tab.
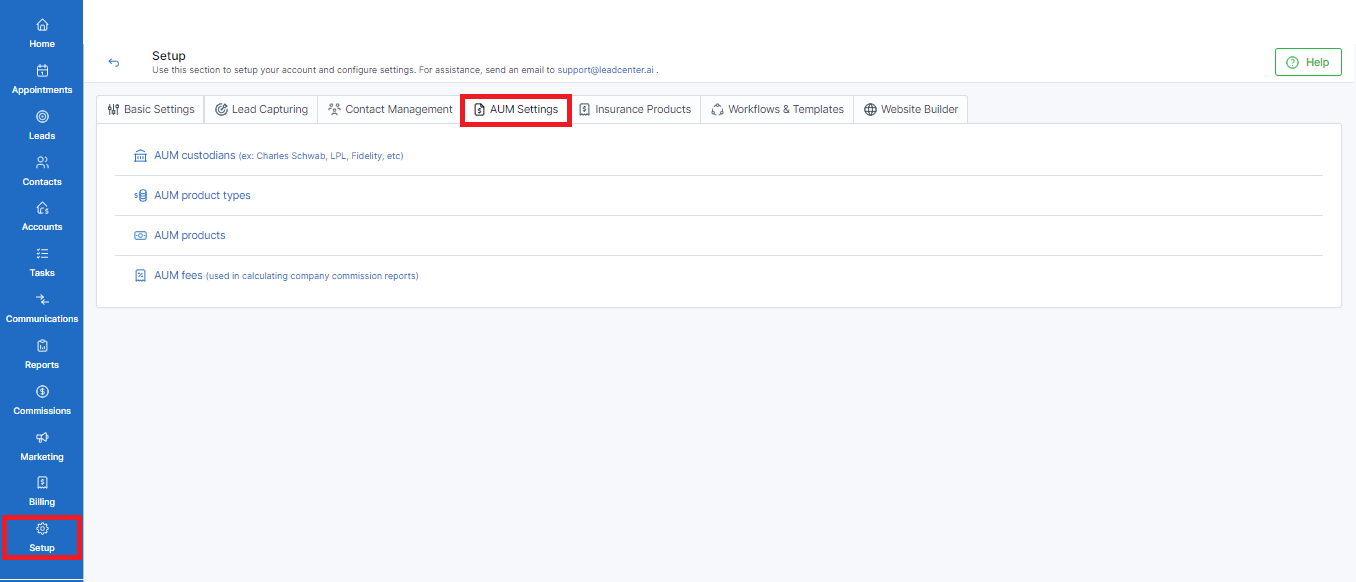
- Go on to configure AUM settings as required.
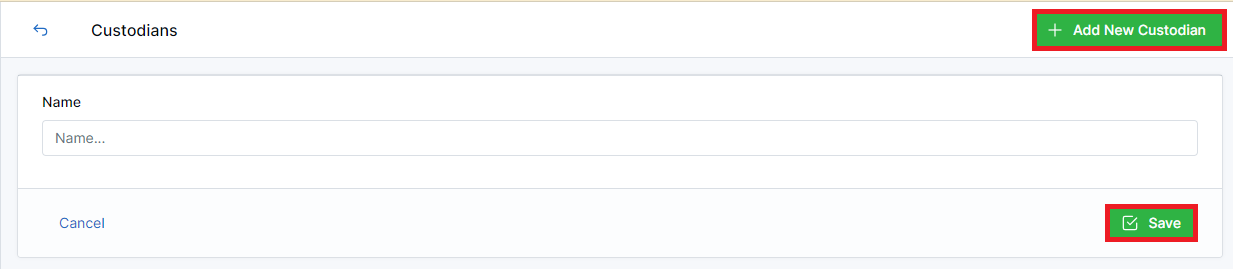
Configuring AUM custodians
- Click on AUM custodians in the AUM Settings tab.
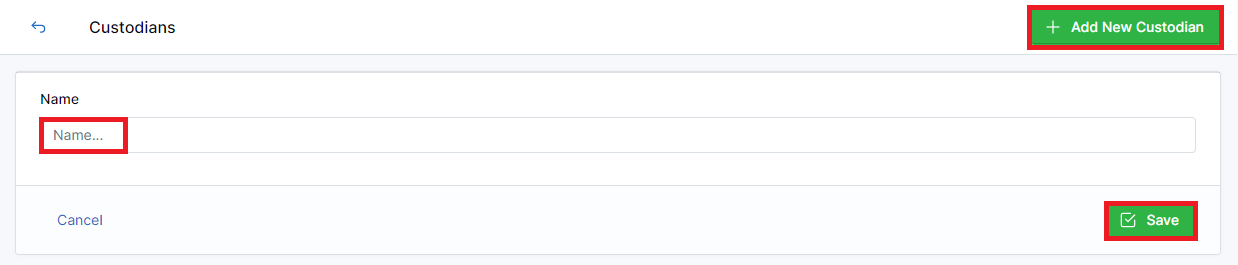
- Click Add New Custodian button on the right side.
- Write the name of the required custodian in the Name field.
- Click Save to proceed or Cancel to go back.
Configuring AUM product types
- Click on AUM product types in the AUM Settings tab.

- Click Add New AUM Product Type button on the right side.
- Write the name of the required AUM product type in the Name field.
- Click Save to proceed or Cancel to go back.

Configuring AUM products
- Click on AUM products in the AUM Settings tab.
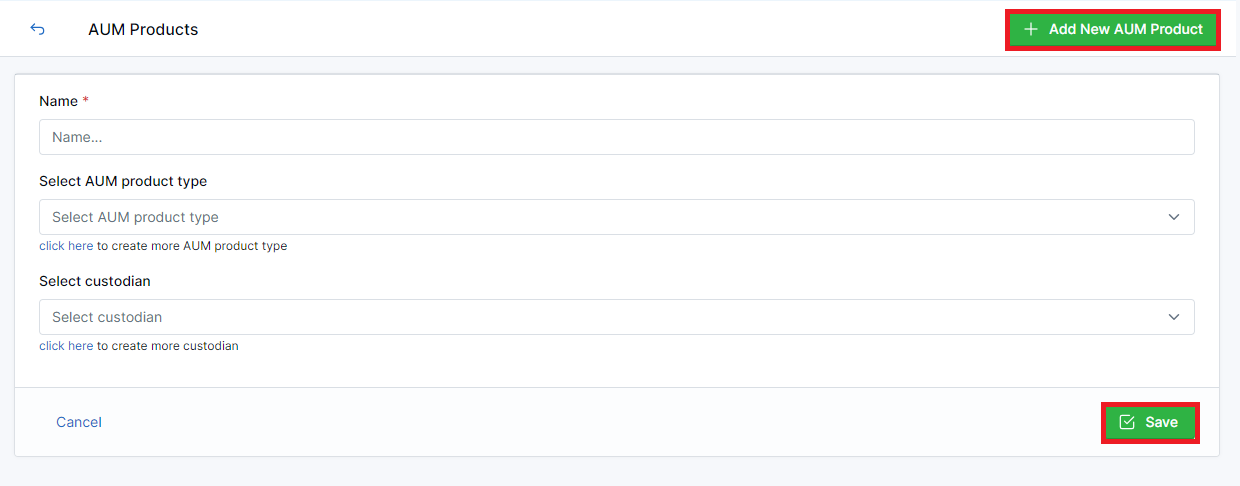
- Click Add New AUM Product button on the right side.
- Write the name of the required AUM product in the Name field. Note: This field is mandatory.
- You can use the already configured information for the Select AUM product type and Select custodian fields.
- Click Save to proceed or Cancel to go back.
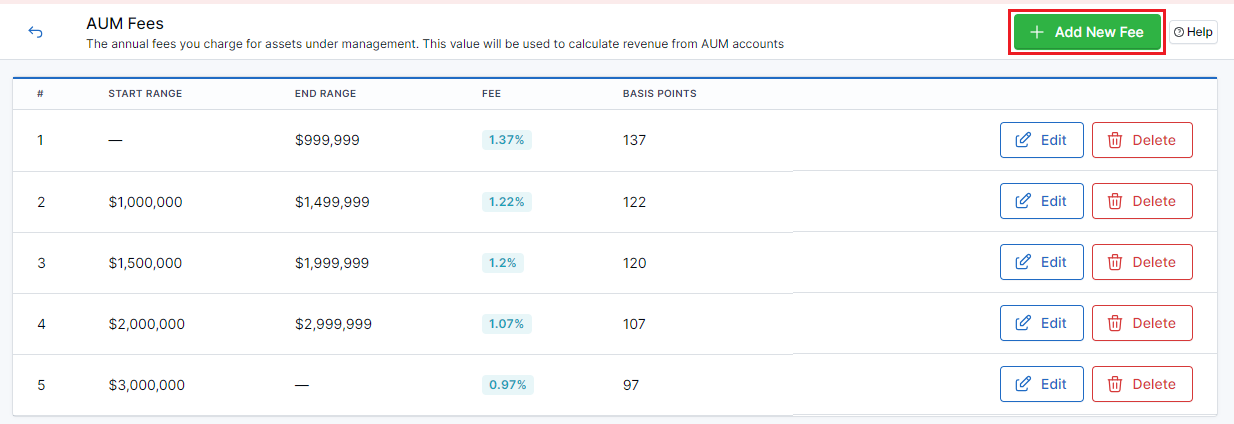
Configure AUM fees
- Click on AUM fees in the AUM Settings tab.
- Click Add New Fee button on the right side.
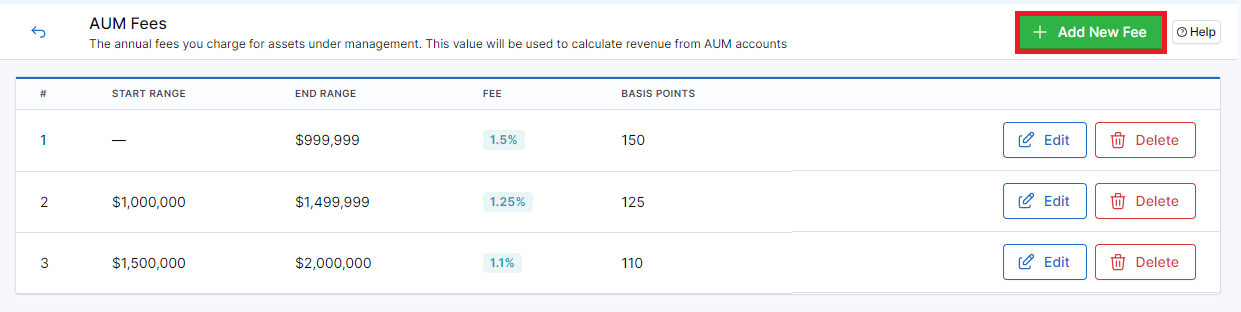
- A modal will open.
- Set up the Start Range and Fee. Note: While adding AUM Fee, the first start range must always be Zero (0).
- Click Save Changes to proceed or Cancel to go back.

LeadCenter enables you to configure commission payments in your account and automate the compensation calculation process. It helps you track and record commission payments and enhances transparency and accuracy.
Commissions
You can find the Commissions section in the left navigation sidebar of your screen. Move the cursor on Commissions to reveal its subsections and select as required. The subsections you can access are:
- Commission Payments
- Advisors Commission Plans
- AUM Fees
- Insurance Products Commission
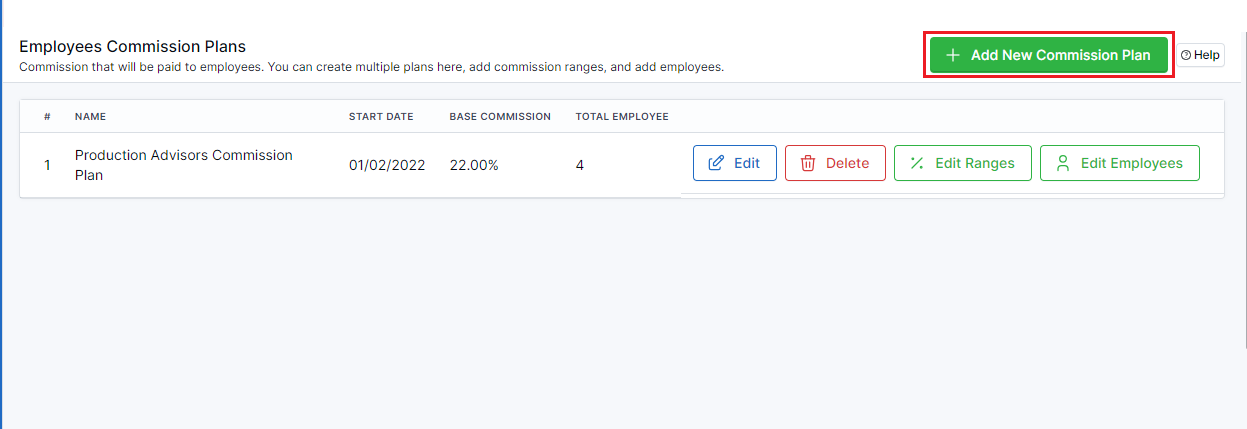
Configure Advisors Commission Plans
- Move the cursor over Commissions in the left navigation sidebar and click on Advisors Commission Plans.
- You’ll see a list of Employees Commission Plans.
- Click on Add New Commission Plan button on the top right side.
- A modal will open.
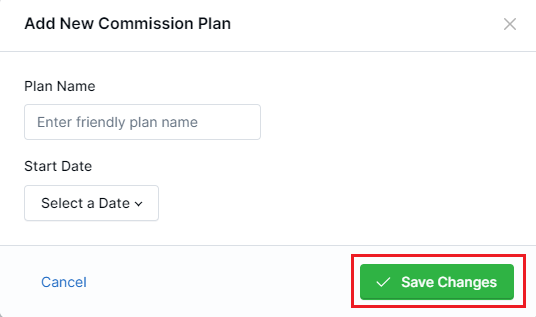
- Fill in the relevant information.
- In the Plan Name field, write the name of the plan.
- Click on the Select a Date dropdown to open the calendar and choose a starting date for this plan.
- Click the Save Changes button to proceed or Cancel to go back.
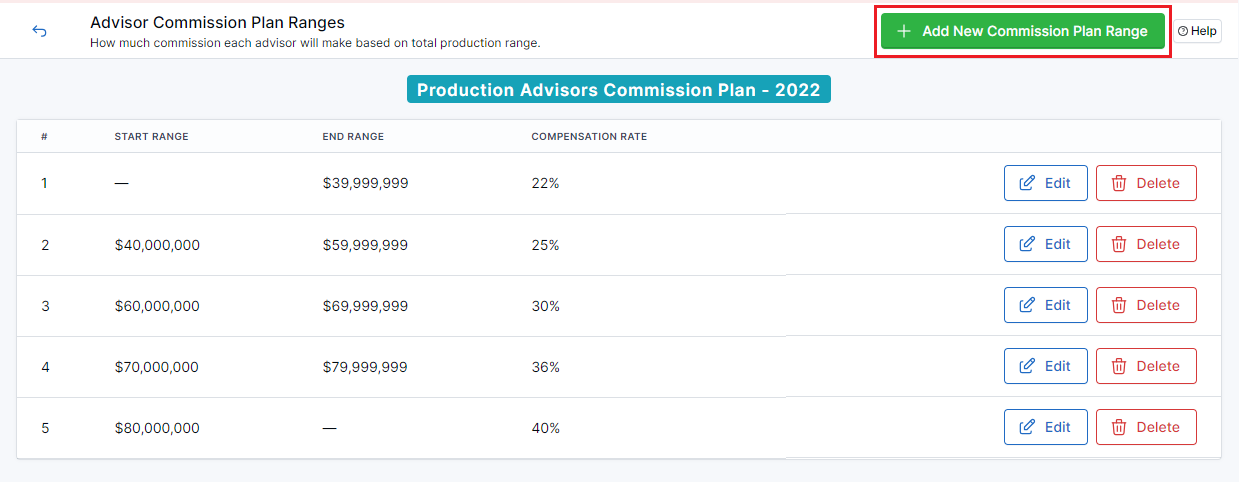
Configure ranges
To configure the ranges for this plan, follow these steps:
- After saving the changes for the newly created commission plan, click on Edit Ranges to set up employee commission accordingly.

- You'll be directed to Advisor Commission Plan Ranges.
- Click on the Add New Commission Plan Range button on the right side.
- A modal will open.
- Fill in the relevant information in the following fields:
- Start Range: Set up the required start range for this plan. Note: The starting range for each plan's first entry is always zero.
- Compensation Rate (%): Enter the percentage for compensation rate.
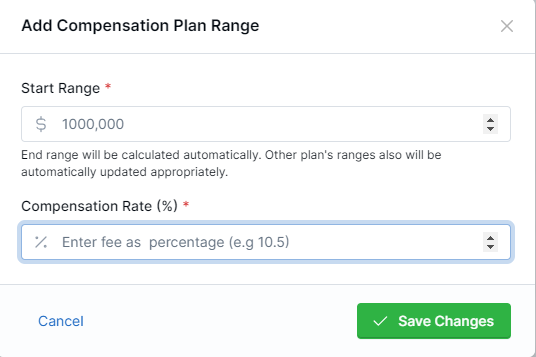
- Click the Save Changes button to proceed or Cancel to go back.
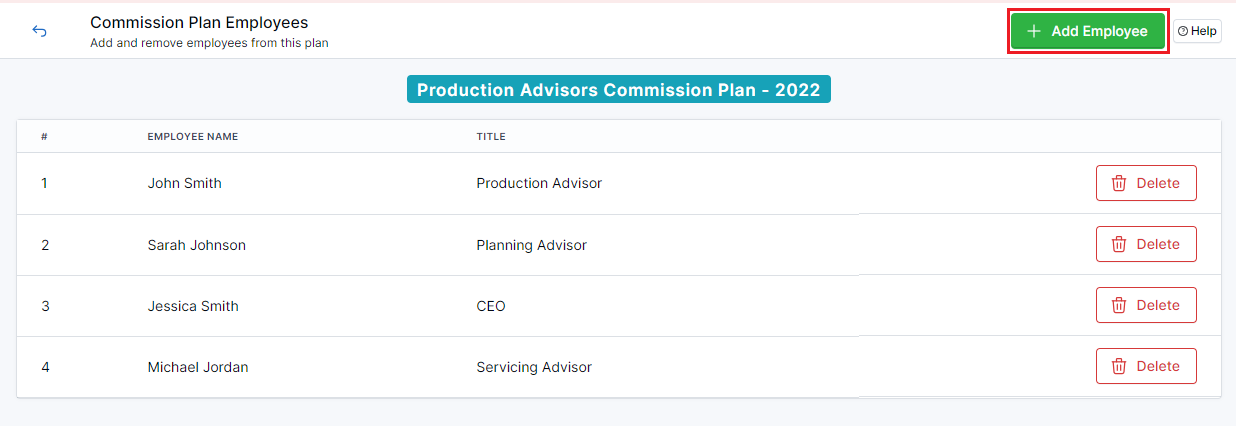
Add employees
To add employees to the commission plan, follow these steps:
- Click on Edit Employees next to the commission plan.

- You’ll be directed to a list of Commission Plan Employees.
- Click on the Add Employee button on the right side.
- A modal will open.
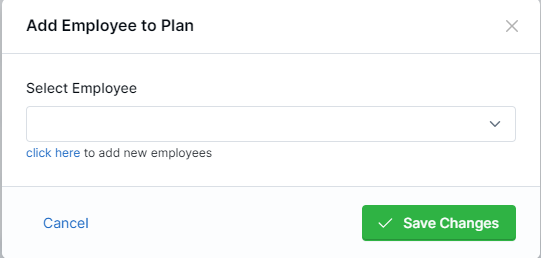
- Write the name of the employee in the Select Employee field or use the down arrow to see a list of employees.
- Click Save Changes to proceed or Cancel to go back.
Configure AUM Fees
- Move the cursor over Commissions in the left navigation sidebar and click on AUM Fees.
- Click on the Add New Fee button on the top right side.
- A modal will open.
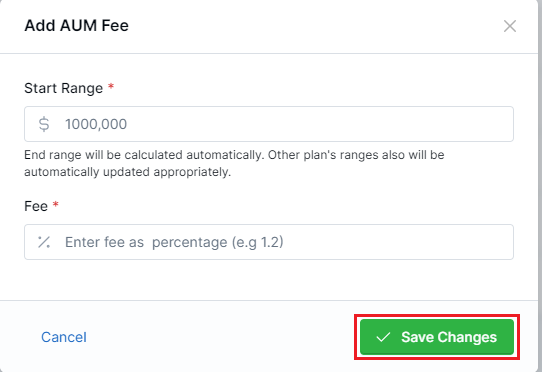
- You need to fill in the information in both fields to proceed. Note: While adding AUM Fee, the first start range must always be Zero (0).
- Click the Save Changes button to proceed or Cancel to go back.
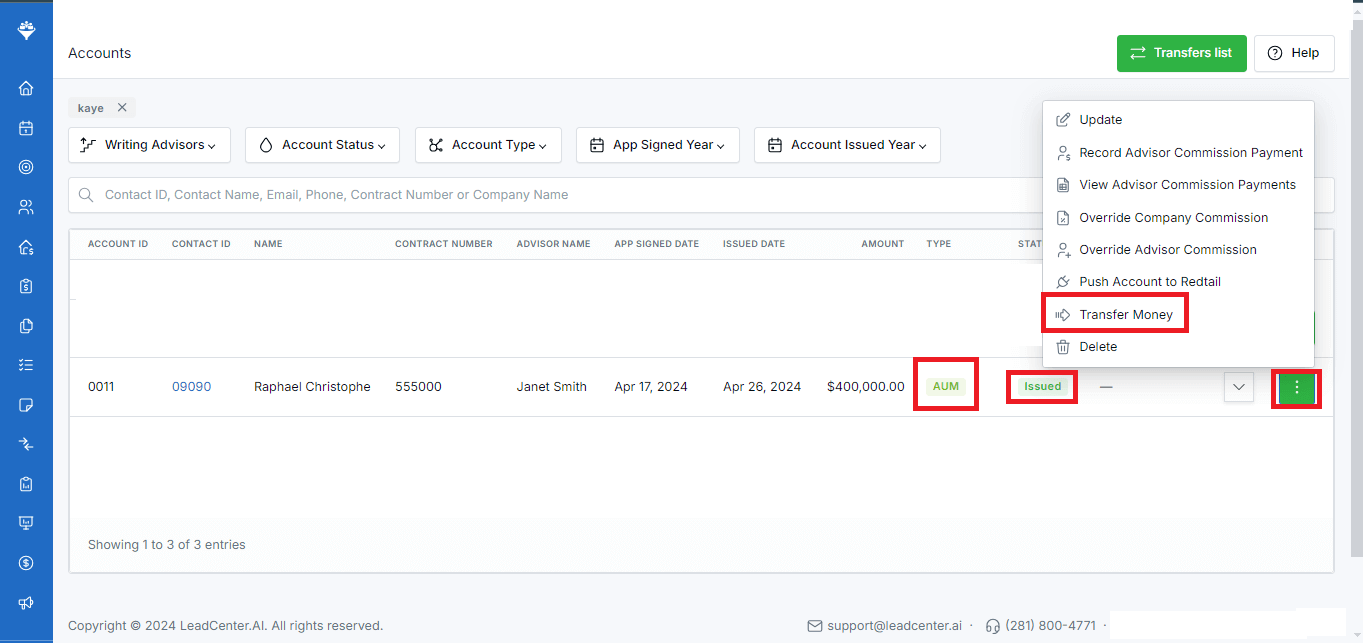
Transfer money between accounts
In addition to configuring AUM fees, you can also transfer money from one issued AUM account to any of the pending accounts. Follow the step-by-step instructions given below to successfully transfer funds from one issued AUM account to a pending one:
- Go to the accounts list by clicking on Accounts in the left side navigation panel.
- Navigate to the required issued AUM account.
- Click on the three-dot menu in the Action column.
- Select Transfer Money from the list of options.
- In the dialogue box on screen, click on the Select Account to Transfer to drop-down and choose a pending account to transfer funds to.
- Enter the amount to transfer in the Amount to Transfer field.
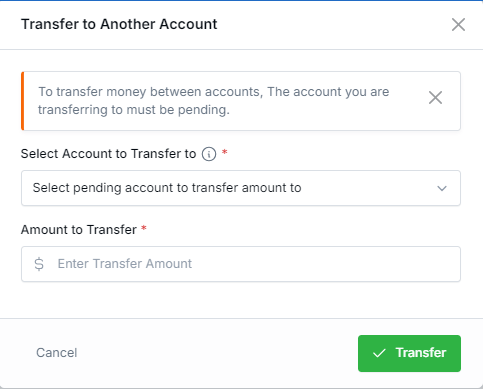
- Click Transfer to confirm or Cancel to go back.
Configure Insurance Products Commissions
- Move the cursor over Commissions in the left navigation sidebar and click on Insurance Products Commissions.
- Click on the Add new Insurance Product Commission button on the top right side.
- You’ll see a form to fill out the relevant data.
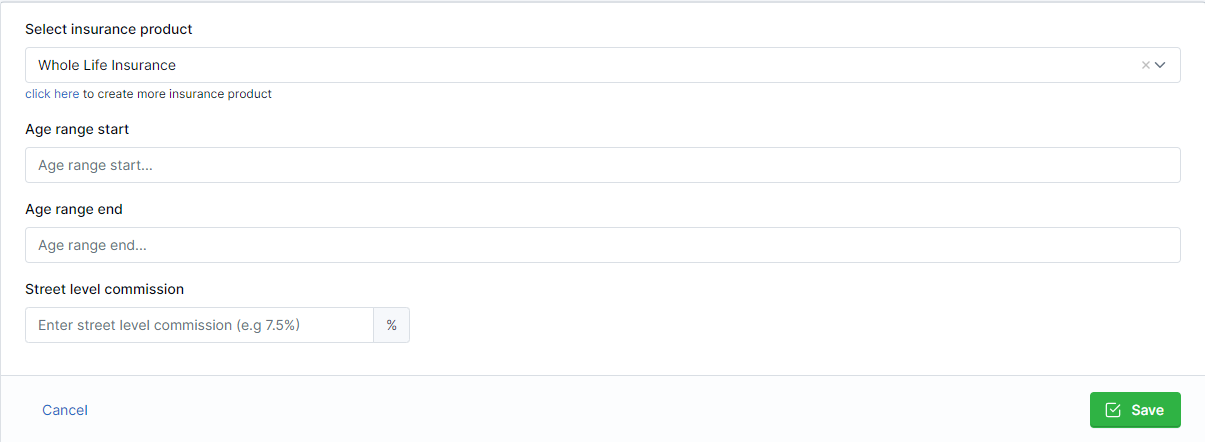
- Once done, click Save to proceed or Cancel to go back.
Configure Commission Payments
To set up commission payments, follow the steps given below:
- Click on Accounts in the left navigation sidebar.
- You’ll see a list of client accounts.
- Click on the three-dot menu in the Actions column next to the account you want to add the commission payment for.
- Select Commission Payment from the list of options.
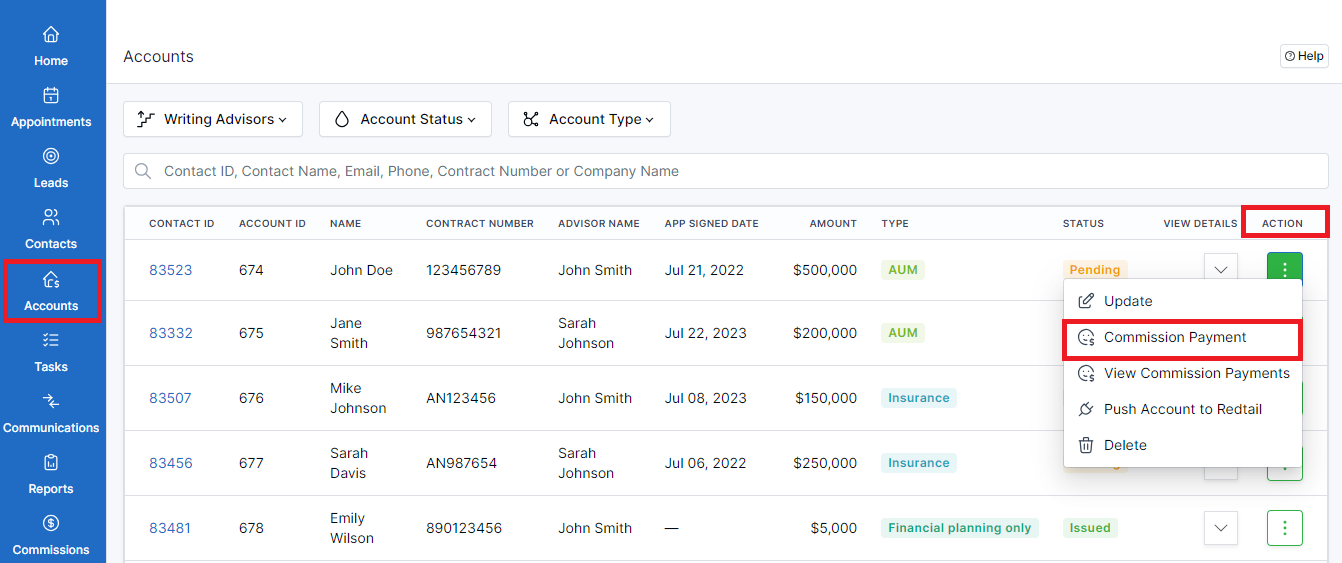
- A modal will open.
- Fill in the relevant information in the given fields as required. Note: The fields marked with an asterisk are mandatory.
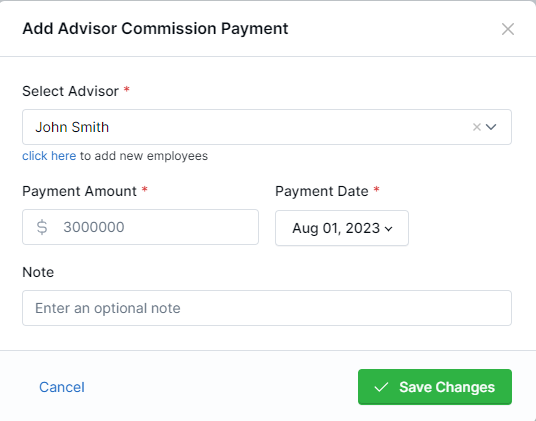
- Click the Save Changes button to proceed or Cancel to go back.
You can configure payment amount while configuring commission payments.
Follow the steps given below:
-
Click on Accounts in the left navigation sidebar.
- You’ll see a list of accounts.
-
Click on the downward arrow in the
View Details column next to the account you’re
configuring commission payment for.

-
From the
Revenue and Commission section, copy the
Advisor Base Commission Amt (Estimated) and paste it
into the Payment Amount field.

LeadCenter presents you with the Accounts feature to keep a consistent database and optimize your daily operations. You can use this feature to configure essential details like the total amount of funds involved, the account information, applicable tax type, etc.
You can set up one of the three account types based on your client’s requirements. The available account types are:
- AUM - Assets Under Management
- Insurance account
- FPO - Financial Planning Only
Setting up an account
- Sign in to your LeadCenter account.
- Click on Contacts in the left navigation sidebar.
- In the search bar, type in the name of the contact you want to set up the account for and press Enter.
- Click on the three dots in the Actions column and select Create Account.
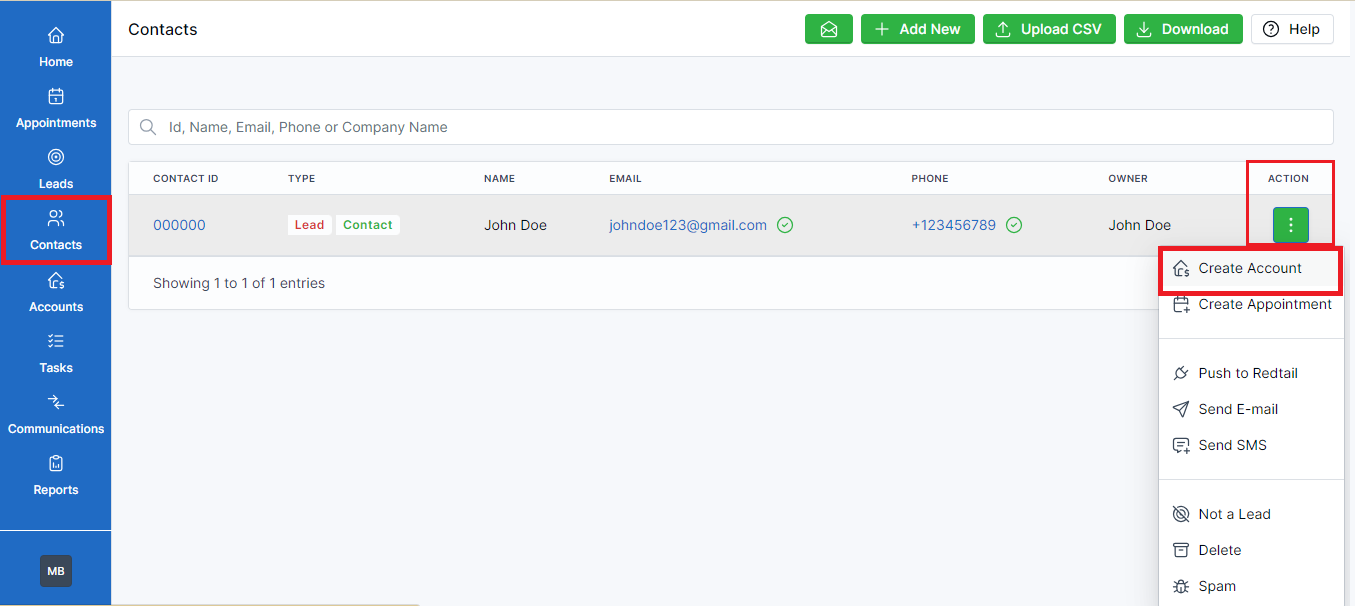
- You’ll be directed to the Accounts screen.

- You can configure settings according to the account type:
AUM - Asset Under Management
- Select AUM as the Account type.
- Click on the Account status drop-down and select the current status. *Note: The default Account status is Pending. However, you can change this to Issued or Cancelled as required.
- Check the box next to Yes in the Text qualified field if this account is taxable.

- Fill in the information in the following fields
- Account number: The unique identifier assigned to the account for tracking the investable funds.
- Amount: The actual amount that has been invested.
- Tax type: The tax type applicable to this account. For example, individual, joint, trust, or corporate.

- Select custodian: The financial institution responsible for the safekeeping of your client’s funds.
- Select AUM product: The specific product(s) where your clients funds will be invested.
- Writing advisor: The financial advisor taking charge of this account.
- Engagement signed date: The date when your client signs the engagement agreement outlining the terms and conditions of the advisory relationship.
- Application signed date: The date when the client signs the contract to open the account.
- Account funding date: The date when the funds are deposited in the account.
- Notes: Write down any other important details here.

- Received in bank date: The date when the funds were received in the account.
- Received in bank amount: The total amount received in the account.
- Click Save to confirm the account setup or Cancel to go back.

Insurance
To set up an Insurance account, follow these steps:
- Select Insurance as the Account type.
- Configure details like the AUM account except for the following fields:
- Select insurance company: The name of the insurance company which provides insurance products for the client's account.
- Select insurance product: The name of the specific insurance product that you’ll select for this client's account. For example, life insurance, health insurance, annuities, etc.
- Product age range: The eligibility criteria that your client must meet to be eligible for this particular insurance product.
- Contract issue date: The date when the insurance contract was issued to the client.
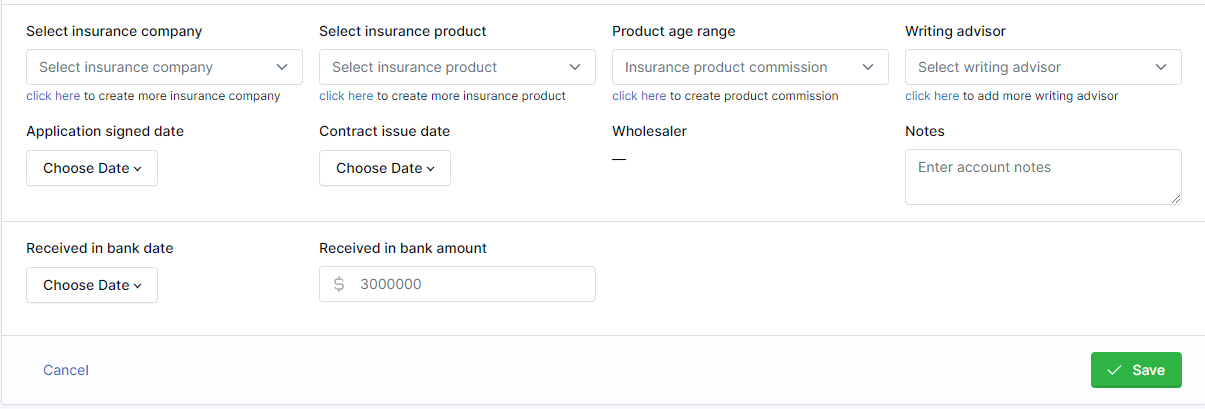
- Click Save to confirm this setup or Cancel to go back.
You’ll see a click here link under certain fields.
Click on this link to add the following field types:
Select insurance company
Select insurance product
Product age range
-
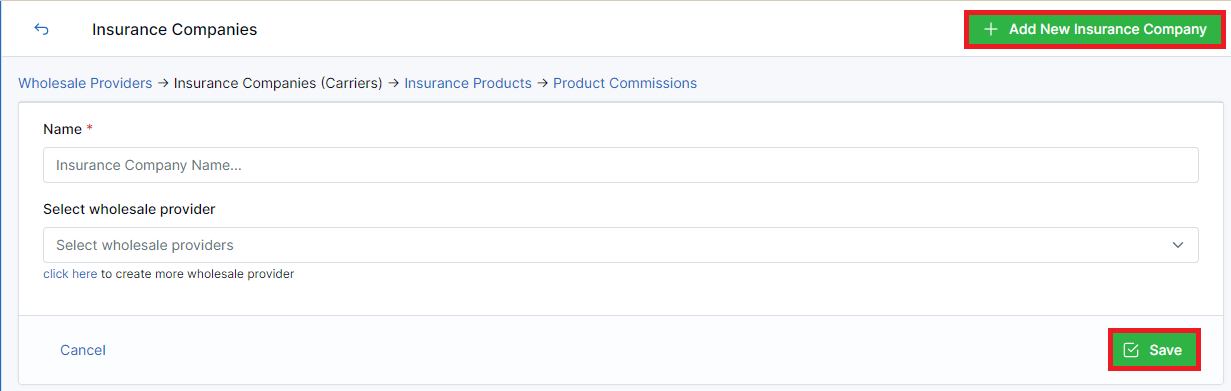
Press the “click here” link under this field.
-
Click the Add New Insurance Company button in the top
right corner.
-
In the Name field, write the name of the insurance
company for this account.
-
Please note that only the Name field is mandatory. You can fill out
other fields for the insurance company as required.
- Click Save.
-
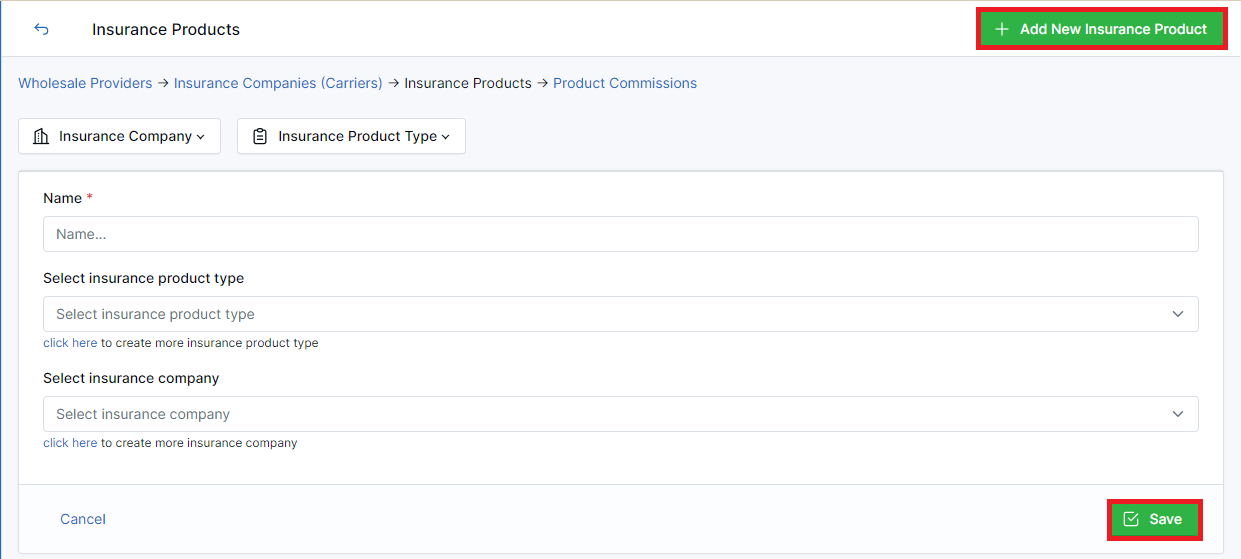
Press the “click here” link under this field.
-
Click the Add New Insurance Product button in the top
right corner.
-
In the Name field, write the name of the insurance
product for this account.
-
Please note that only the Name field is mandatory. You can fill out
other fields for the insurance product as required.
- Click Save.
-
Press the “click here” link under this field.
-
Click the Add new Insurance Product Commission button
in the top right corner.
-
In the Select insurance product field, write the name
of the insurance product for this account.
-
Go on and fill out other fields for the product age range as required.
- Click Save.
FPO - Financial Planning Only
To set up an FPO account, follow these steps:
- Select FPO as the Account type.
- Configure details like the AUM and Insurance account except for the following field:
- Account issue date: The date when the client handed the account over to you (the writing advisor) for managing the funds. It marks the beginning of the financial planning services provided to the client by the selected financial advisor.

- Click Save to confirm this setup or Cancel to go back.