The Advanced Coding feature of LeadCenter.AI Website manages the customized CSS and JavaScript Coding. For using your advanced coding knowledge, Orxy Cloud provides a space for writing your customized codes in the supported formats. You can use the CSS and JavaScript to change fonts, colors, and backgrounds etc.
To add CSS and JavaScript codes to your website pages, do the following;
In LeadCenter.AI Store Manager > Website Builder, click Advance > Coding. The Advanced Coding page is displayed.
Add or write the CSS/JavaScript code in the provided space.
Click Save Changes to save the changes the added code.
Click on icon to see customized pages of the website.
The Advanced Styling feature of LeadCenter.AI Website is an advanced form of styling which by default has plain and minimal styles. There are no rounded corners shadows etc. It list a range of advanced styling which can be changed or modified according to your requirement. The Default style which is generally applied to any new website which is created.
To change or modify Advanced Styling for Website;
In LeadCenter.AI Store Manager > Website Builder, click Advance > Styling. The Advanced Styling page is displayed.
Choose the style for your website from the given list.
On the selected style click on Apply Style A message is displayed "Successfully applied the style."
Click on icon to see the newly applied style for the website.
The Advanced Typography feature of LeadCenter.AI Website is a type of design which uses advanced form of font, size, color, layout and alignment. It list a range of advanced typography which can be changed or modified according to your requirement.
To change or modify Advanced Typography of Website;
In LeadCenter.AI Store Manager > Website Builder, click Advance > Typography. The Advanced Typography page is displayed.
Choose the typography for your website from the given list
On the selected typography click on Apply Typography The message is displayed "Successfully applied the typography".
Click on icon to see the newly applied theme for the website.
The Advanced Coloring feature of LeadCenter.AI Website manages the color scheme of your website. It comes with a pre-defined set of color schemes which you can choose from. Each pre-defined template comes with two major colors which is the primary color and secondary color, which comes with both light and dark options. It also provides the user to create their own color schemes from the Advanced Coloring panel. You can create your own primary and secondary colors by adding the color in hexadecimal format. To change or modify Advanced Coloring, do the following;
In LeadCenter.AI Store Manager > Website Builder, click Advance > Coloring. The Advanced Coloring page is displayed.
In Advanced Coloring page go to Choose Colors panel.
To modify select the color from the pre-defined list and click on "Apply Litera Colors" for example A success message is displayed "Successfully Applied the Colors"
To customize the Advanced Coloring, do the following;
In LeadCenter.AI Store Manager > Website Builder, click Advance > Coloring. The Advanced Coloring page is displayed.
In Advanced Coloring page go to Choose Colors panel.
To modify the Primary and Secondary Colors go to Brand Colors and add the colors in hexadecimal format.
To modify the for the body color, text etc. go to Miscellaneous in hexadecimal format
Click Apply Advanced Colors to save the customized changes. A success message is displayed "Successfully Applied the Colors"
The LeadCenter.AI Website Builder comes with its in-built Website Page Designer Tool. This is a very easy-to-use formatting tool, that lets you edit and customize your website page. You can drag and drop the blocks, update them with new content, image, links, etc in each of the blocks.
To add content blocks to your website, do the following:
In LeadCenter.AI Store Manager > Website Builder, click Pages. The Custom Pages window is displayed
Select a page to modify the SEO Options
Click Actions drop-down and click on Edit
Click Toggle on the left panel OR Click Snippet on the right panel This displays the pre-built in content blocks
Drag and drop the content boxes, wherever you need to add a new block Dragging Content Block
Dropping Content Block You have successfully dragged and dropped the content block.
Formatting Content Block
The Formatting Toolbar of Website Page Designer provides the basic formatting options like Bold, Italics, images, texts, symbols, etc.
To format the content block on your website, do the following:
In LeadCenter.AI Store Manager > Website Builder, click Pages. The Custom Pages window is displayed
Select a page, where you want to format the content block
Click Actions drop-down and click on Edit
Click your mouse on the content or text to be formatted. The Formatting Toolbar pane shows up on your left.
Edit and format the required sections using the Formatting Toolbar.
Click Save Changes on the left side panel. You have successfully formatted the page.
Customizing Images
To modify your website images, do the following:
In LeadCenter.AI Store Manager > Website Builder, click Pages. The Custom Pages window is displayed
Select a page to edit and customize images
Click Actions drop-down and click on Edit The editing page is displayed.
Click the image to be modified or updated and clickChoose Image.
Select and upload the image to be replaced with Wait for the image to be uploaded. The latest image will be uploaded.
To edit the link for the updated image. do the following:
On the image click
Enter the details for the Image Data window
Click OK once the field parameters are added.
To modify the aspect ratio, do the following:
On the image click
Select the required aspect ratio and click Apply
Click on Save Changes on the left side panel.
Additional Formatting Options
To use the additional format for your website page, do the following:
In LeadCenter.AI Store Manager > Website Builder, click Pages. The Custom Pages window is displayed
Select a page to modify additional formatting options
Click Actions drop-down and click on Edit The editing page is displayed.
Click Add to use the additional formatting options This lets you add the placeholders for paragraphs, images, etc.
Click More to get additional options( like moving a block up, down, duplicating, etc.)
Click to move a block, image, etc
Editing SEO Options
To edit the SEO Options for a website page, do the following:
In LeadCenter.AI Store Manager > Website Builder, click Pages. The Custom Pages window is displayed
Select a page to modify the SEO Options
Click Actions drop-down and click on Edit Page Edit
Click on Page Options & SEO Editor on the left side panel
Enter the details for the SEO Parameters and click Done The Page Options & SEO Editor window is closed.
Click on Save Changes on the left side panel.
Editing HTML Code
To edit the HTML code for a website page, do the following:
In LeadCenter.AI Store Manager > Website Builder, click Pages. The Custom Pages window is displayed
Select a page to modify the HTML code
Click Actions drop-down and click on Edit
Click on the left side panel The HTML code of the page is displayed for editing the code
Edit the code to be modified and click OK The HTML code editor window is closed.
Click on Save Changes on the left side panel.
Editing Images from Image Manager
To edit the Images from Image Manager for a website page, do the following:
In LeadCenter.AI Store Manager > Website Builder, click Pages. The Custom Pages window is displayed
Select a page to modify the Image
Click Actions drop-down and click on Edit
Click on the left side panel The Image Manager window is displayed.
Click on Choose File to choose the image and click Upload.
Click on Save Changes on the left side panel.
LeadCenter.AI Website is where you can create the landing pages for the website without a header or footer. A landing is usually a standalone webpage, which is specifically created or designed for marketing for your website. It generates visitors to leads for your specific website, with just a click on a link in an email, or ads from Google, social media platforms or similar places on the web. It is basically designed with a single focus or goal to achieve that benefits your website.
To create a landing page without header and footer;
In LeadCenter.AI Store Manager > Website Builder, click Pages. The Custom Pages window is displayed
Select the landing page and from the Actions drop-down click Edit
The editing page is displayed.
Click on Page Options & SEO Editor on the left side panel The Page Options & SEO Editor page is displayed.
Slide the Hide Common Header or Hide Common Footer button
Click Done to save the changes To see the changes go to home and click on the Refresh button.
Blogs provides a gateway to share your story about your brand and what your company wants to achieve. It helps to establish your brand thereby establish your online presence. This section will show you how to create articles for your blog using LeadCenter.AI Website Builder so you can start publishing your blogs today.
The following operations are supported from the Blog section;
Create an Article
Edit an Article
Unpublish an Article
Publish an Article
Delete an Article
Create an Article
To create an article for the blog, do the following;
In the left navigation panel, click Blog My Blog page is displayed
Click on Create Article The Create Article page is displayed.
Follow the steps provided in the Create Article page. Refer below table to fill in the required information to create the article.
Field
Description
Basic Details
1. Title : Enter a catchy and SEO friendly title for your article. 2. Publish Date : Select the publish date for your article from the calendar.
Upload Featured Image
Choose File: Choose an image for the article which will be displayed along with the Blog.
Write Main Body
An editing space is provided to write your article. It has its own text editor where you can format and customize the article according to your requirement.
After making the changes click on Create Article button
In the top menu items click on the Blog page to see the newly added article. You have successfully created the article for your website Blog page.
Edit an Article
To edit an article for the blog, do the following;
In the Orxy Cloud Store Manager > Click Blog in the left navigation panel My Blog page is displayed
Choose the blog to be modified and click Actions > Edit My Article page will be displayed.
Edit the information to be modified and click Save Changes button. The modified information is saved.
In the My Blog page click Actions > Refresh
Click on Refresh button and click on the main menu Blog page to see the modified article. You have successfully modified the article.
Unpublish an Article
LeadCenter.AI provides the option to unpublish a article from your webpage. Even though it is unpublished it is stored in the My Blog page. You can publish it again at your website at a later point of time. If you want to permanently delete a blog click this link.
To unpublish an article from the blog, do the following;
In the Orxy Cloud Store Manager > Click Blog in the left navigation panel My Blog page is displayed
Choose the blog to be unpublished and click Actions >Unpublish After an article is unpublished, it will display as Unpublished in the Status.
Publish an Article
To publish an article for the blog, do the following;
In the Orxy Cloud Store Manager > Click Blog in the left navigation panel My Blog page is displayed
Choose the blog that was unpublished and click Actions >Unpublish After an article is published, it will display as Live in the Status.
Delete an Article
To delete an article from the blog, do the following;
In the Orxy Cloud Store Manager > Click Blog in the left navigation panel My Blog page is displayed
Choose the blog to be deleted and click Actions >Delete The page is deleted from My Blog page lists.
The Orxy Cloud Menu page is where you can organize the menu items for your website by adding and organizing your menu items. The Menu page is organized into different sections.
Menu Page
This Menu Page section will guide you to use the Menu page and use the different navigation sections.
To open the Menu Page, go to LeadCenter.AI Store Manager > Website Builder, click Menus. The Menus page opens on the right side of your screen. This section allows you to add new menu items, organize menu items, and delete the menu items.
Adding New Menu Item
Adding a new menu item to your site's navigation lets you create a menu item, that allows users to explore the content of your website. This section guides you in adding a new menu item to your navigation and the types of layout.
To add a new menu item to the website's navigation menu, do the following:
In LeadCenter.AI Store Manager > Website Builder, click Menus.
In Configure Menus section, click Add New Menu Item.
Add the new title for the new menu item, like Service or Contact.
Under Type, select the type like Page or Blog/Offer List.
Click to save the changes made to the new menu item.
Click on the globe icon to see the published navigation page.
The new menu item is added to the list of navigation for your site.
Types of Menu Items
Link or Top Menu Item: This Link or Top Menu Layout type provides you the URL to link to any particular site that you want your customer to see. This layout type is displayed as a top menu item in the list of navigation for your site.
Page: Page Layout Type are multi-purpose layouts with a mix of body text, headers, and images. These layout pages come with a combination of block sections, with text-centric layouts for adding information. To know how to create pages see here.
Blog List: The Blog List is your blog’s landing page. It displays multiple blogs in a list or grid format. Clicking a Blog list title or thumbnail image lets you open the individual blog post on its own page. You can have multiple Blog Article Page on your site. To know how to create blogs see here.
Blog Article Page: Blog Article pages are sub-pages of a Blog List. Each blog article page has its own page and you can add many blog article pages to a Blog List.
Offer List: The Offer List displays multiple offers in a list or grid. Clicking on an Offer List title or thumbnail image lets you open the individual offer list on its own page. You can have multiple Offers on your site for your customer.
Offer Page: Offer Page are sub-pages of an Offer List, which provides a detailed description of any particular offer. All the offers added in the Offer List will be displayed as a part of the Offer Page.
Modal Form: A modal pop-up form is used to get information about the customer or lead. It generally shows up when u click on a certain button where you can get additional information about the lead.
Organizing Menu Item
Orxy Cloud Website Builder lets you organize your site's navigation menus, by dragging and dropping pages around the Configure Menus section. This section guides you to reorganize menu items. The menu order in your Configure Menus section determines the order of your site's navigation menu.
To organize menu items, do the following:
In LeadCenter.AI Store Manager > Website Builder, click Menus.
In Configure Menus section, drag a menu item you want to move.
Release the menu item to the desired location in the Configure Menus section.
Click to save the changes you have made to the new menu item.
Click on the globe icon to see the published navigation page.
The updated navigation list is displayed for your website.
Deleting Menu Item
You can easily delete a menu item from the site's navigation menus.
Deleting a menu item removes all content on the page.
The deleted menu item cannot be restored.
Deleting a menu item removes all submenu items if present.
To delete a menu item from the web site's navigation menu:
In LeadCenter.AI Store Manager > Website Builder, click Menus.
In Configure Menus section, select the menu item you want to delete and click on the down arrow icon.
Click on Delete to delete the menu item.
Click to save the changes of deleting the menu item.
Click on the globe icon to see the published navigation page.
The deleted menu list is removed from navigation list is displayed for your site.
This section guides you through adding pages and deleting pages to your navigation. You can use different types of pre-defined templates as well as build your own templates from scratch.
Adding a Page to your Website
To add a page to your website, do the following;
In LeadCenter.AI Store Manager > Website Builder, click Pages. The Custom Pages will be displayed.
Click on icon to add a new custom page. A pop-up dialog box is displayed.
Choose from the available pre-built templates or choose New Empty Page to customize and create your own page
Click on button The newly added page is opened.
Click on Open page options & SEO editor icon . The Page Options & SEO Editor pop-up is displayed.
Add the basic information and click .
Field
Description
Name
Add the name of your webpage
URL
Add the URL of your webpage
SEO (Search Engine Optimization) Title
This title is mainly used for SEO purposes. It should be between 50 - 60 characters in length.
SEO Description
This description field is mainly used for SEO purposes. It should be between 155- 160 characters in length.
SEO Facebook Image URL, SEO Twitter Image URL
When you send your website link to Twitter or Facebook this image will show up as the post image.
On the left side of the navigation panel, click on to save the changes.
Deleting a Page
To delete a page to your website, do the following;
In LeadCenter.AI Store Manager > Website Builder, click Pages. The Custom Pages will be displayed.
Choose the page to delete and click on Actions > Delete
A confirmation message will be displayed for deletion, Click Yes, delete button to delete the page A successful message will be displayed after the deletion "Successfully deleted the page".
LeadCenter.AI Website Builder Pages is where the navigation and title or logo of your website is displayed. The header and footer is same throughout all the pages of your website. The header is positioned at the top of your site's website and the footer is positioned at the bottom of your site's website. This section describes how to customize or build your site header and footer and display additional features, such as a image or logo, phone number and email ID, social media icons etc. As it is not possible to create a page-specific header, it let you create landing pages without header and footer. See Creating Landing Pages without Website Header and Footer for more information.
The layout page for customizing header and footer is displayed below. See Menus for more information on customizing menus.
To open the Pages page, go to LeadCenter.AI Store Manager > Website Builder, click Pages
The Pages page opens on the right side of your screen. The section allows you to customize the website header and footer for the following;
Customizing Image
Customizing Link
Editing Image
Formatting
Additional Options
Deleting an Element
Customizing Image
To customize the image for the website header or footer;
In LeadCenter.AI Store Manager > Website Builder, click Pages. The Custom Pages window is displayed
Go to Website Header/Footer > Actions and from the Actions drop-down click Edit
Click on the image or logo that you want to modify and Click on image icon (Add the icon) The image or logo should be of 50pixels height and 200width
Select and the required image or logo from your system and click Open The new image or logo is uploaded by replacing the previous image.
Click to save the changes.
Customizing Link
To customize the link for the website header or footer;
In LeadCenter.AI Store Manager > Website Builder, click Pages The Custom Pages window is displayed
Go to Website Header/Footer > Actions and from the Actions drop-down click Edit The Header/Footer customizing page is displayed.
Click on the header or footer link that you want to modify and Click on link icon (Add the icon) The link dialog box is displayed.
Enter the field details and click OK
Source Link: Enter the source link of the image or logo
Title : Enter the title for the image or logo
URL: Enter the URL of the image or logo
Open New Window:
Select the checkbox : Selecting the checkbox opens the link in a new window
Unselect the checkbox: Unselecting the checkbox opens the link in the same window
Click to save the changes.
Editing Image
To edit the image for the website header or footer; @Note: This edit button is applicable only for editing the image or logo;
In LeadCenter.AI Store Manager > Website Builder, click Pages The Custom Pages window is displayed
Go to Website Header/Footer > Actions and from the Actions drop-down click Edit The Header/Footer customizing page is displayed.
Click on the image or logo that you want to modify and Click on edit icon (Add the icon) The image edit dialog box is displayed.
Select and the required dimension and click Apply
Click to save the changes.
Formatting
The Add option includes basic formatting options like adding paragraph, headline, image, headings, list etc.
To add the formatting options for the website header or footer;
In LeadCenter.AI Store Manager > Website Builder, click Pages The Custom Pages window is displayed.
Go to Website Header/Footer > Actions and from the Actions drop-down click Edit The Header/Footer page is displayed.
Click on the header or footer to add formatting options and Click on add icon (Add the add icon) The link dialog box is displayed.
Select the required formatting option like for example; paragraph
Edit the text for the paragraph Click to save the changes.
Additional Options
The ..More option includes additional options like move up, move down, duplicate and settings etc.
To add the additional options for the website header or footer;
In LeadCenter.AI Store Manager > Website Builder, click Pages The Custom Pages window is displayed
Go to Website Header/Footer > Actions and from the Actions drop-down click Edit The Header/Footer page is displayed.
Click on the header or footer to add additional options and Click on ..More icon (Add the More icon) The link dialog box is displayed.
Move Up: Used to move the placeholder for the customized header or footer up.
Move Down: Used to move the placeholder for the customized header or footer down.
Duplicate: Used to duplicate the selected option.
Settings: Used to format the setting options like box, spacing, border text etc.
Select the required formatting option like for example; duplicate
Edit the options which require formatting options like settings and Click to save the changes.
Deleting an Element
To delete an element from the website header or footer;
In LeadCenter.AI Store Manager > Website Builder, click Pages The Custom Pages window is displayed
Go to Website Header/Footer > Actions and from the Actions drop-down click Edit The Header/Footer page is displayed.
Click on the element that you want to delete and Click on delete icon (Add the icon) A confirmation message before deleting the element is displayed “Are you sure you want to delete this element?
Click Delete and Click to save the changes.
Orxy Cloud Website Builder provides a range of pre-built layout pages which are the built-in themes. These are professional page designs and prearranged placeholder blocks. It lets you add content to the blocks, or delete them and the page gives a customized look and feel.
The Choose Theme page also allows you to have a preview at the existing built-in themes, by clicking on the Preview button.
To change the theme for the website;
In LeadCenter.AI Store Manager > Website Builder, click Choose Theme. The Choose Theme page is displayed.
Select the theme that you want to apply and click Apply Theme button The Apply Theme page is displayed.
Type Change Theme in the box below, then click on Change Theme button. A message "Theme change requested. Our team has been informed of your theme change request. They will get back to you shortly." is displayed.
Click on icon to see the newly applied theme for the website.
A domain name and a hosting site is very important for your website. If you purchased a custom domain from a third-party provider, you can set up the domain and DNS records by following the instructions provided in the below topics.
Setting up the Domain
To set up the domain name, do the following;
In LeadCenter.AI Store Manager > Website Builder, click Setup Domain. The Setup Domain page is displayed.
Enter the domain name "https://......" as shown in the screenshot below
Click Save Domain The domain name is saved.
After adding domain name modify the DNS (Domain Name Server) Records.
DNS (Domain Name System) allows users to connect to the websites using domain names instead of IP addresses. It translates domain names to IP addresses so browsers can load Internet resources.
Configuring DNS Records in GoDaddy
To configure the DNS Records in GoDaddy, do the following;
Click on your domain from your domain lists The Domain Settings page will be displayed.
Click on Manage DNS The DNS Management page is displayed. Make sure to delete any A or CNAME records that will conflict with the new records. It is recommended to take a snapshot of those records before you delete them.
On the DNS Management page, click on the Add button
Enter the information in the provided blank fields and click Save.
Type: Select "A"
Name/Host: Enter "@" for the root domain
Points: Hosting server IP address (52.213.115.46)
TTL: 1 Hour (do not modify this)
To point www to your root domain. Click on Add again.
Enter the information in the provided blank fields and click Save.
Type: Select "CNAME"
Name/Host: Enter "www"
Points: Enter "@" to point to the root domain
TTL: 1 Hour (do not modify this)
You have successfully modified the DNS records in GoDaddy.
Configuring DNS Records in Cloudflare
As Cloudflare provides extra features like free SSL, caching, firewall, etc. we highly recommend moving your DNS records to Cloudflare. As it is not a domain provider, you need to continue with the same for example; GoDaddy. Cloudflare will act as a proxy for security-related features. If you want to renew your domain you still need to go and renew it from the domain provider for example; GoDaddy. Please click here for detailed instructions on how to change your domain nameservers to Cloudflare.
SSL/TLS encryption mode When you create a new account in Cloudflare, it will take up to 48 hours to assign an SSL/TLS certificate to your account. Once a certificate is assigned, click on SSL/TLS in the main menu and change Your SSL/TLS encryption mode to Full.
Once your domain is active on Cloudflare, to modify the DNS records do the following; You need to create a Cloudflare account.
Forwarding URL rule with 301 - Permanent Redirect from http://yourdomain.com/* to https://www.yourdomain.com/
Another Forwarding URL rule with 301 - Permanent Redirect from https://yourdomain.com/* to https://www.yourdomain.com/
Always Use the HTTPS rule. Apply to the URL https://www.yourdomain.com/ See the below screenshot for reference.
After the changes click Save and Deploy.
Overview
It is a super-fast website builder and takes less than 30 minutes to build your website. It helps you to customize your domain and customize the URL for SEO, thereby building website pages and menus for your website. It also helps you manage your leads from the dashboard via E-mail and SMS service. For more details see here.
The LeadCenter.AI Website Builder is very easy to use, as it lets you create an entire website within minutes just by using a drag-and-drop editor. It allows you to build the website simply by dragging elements and dropping them to the desired location and modifying it according to your preference. It is the most convenient way to run your business as this allows you to work on your website from anywhere and on any device.
It also allows you to create landing pages without having the common header and footer. For more details see here.
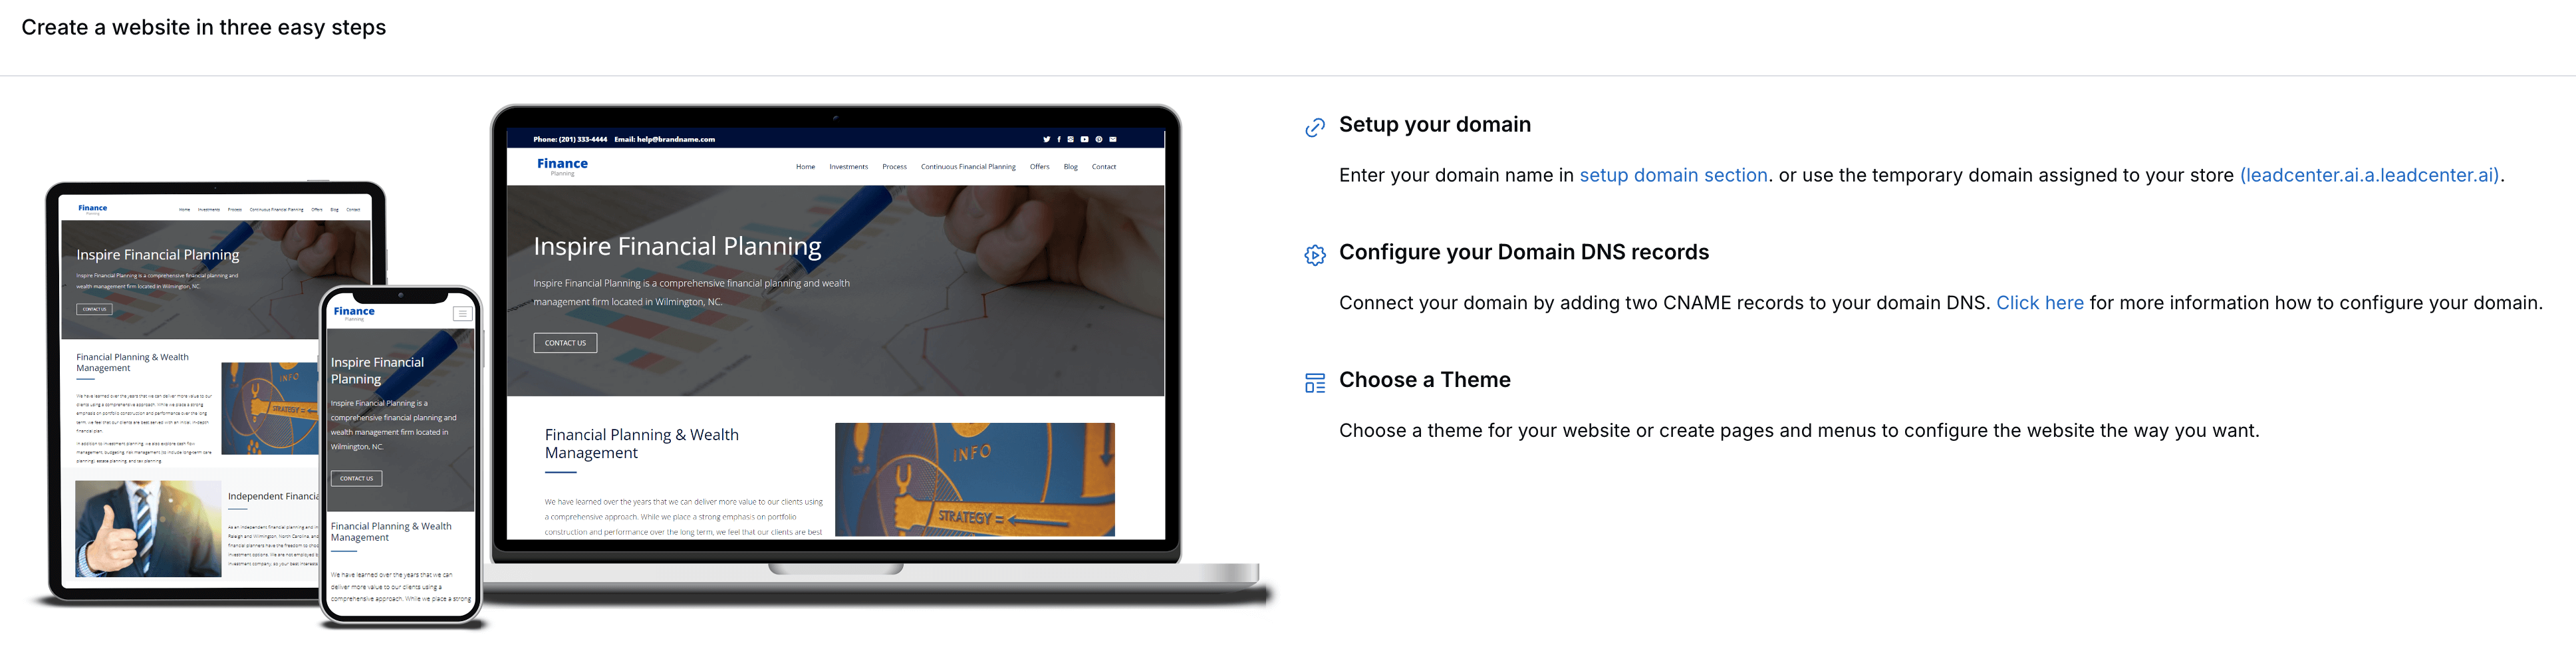
LeadCenter.AI Website Builder helps to build and manage your website in three easy steps.
#Step 1: SetUp your Domain
The first STEP is to set up your domain. You need to enter your domain name in the setup domain section and use the temporary default domain assigned to your store (johndoe.a.leadcenter.ai). For more details to set up your domain, see Setting up the Domain.
The last STEP is to choose a theme for your website or create pages and menus to configure the website the way you want.
Once you have completed these steps, you have successfully completed creating your website.
Key Features of LeadCenter.ai Website Builder
The key features of LeadCenter.ai Website Builder are listed below.
User-Friendly Interface
It provides a very user-friendly interface that allows you to build your website the way you want it, without any coding requirements. It is very helpful for beginners as well as experienced users to use it as you can easily get the site up and running in no time.
High-Quality Themes
It provides high-quality and professional-looking themes in the website builder. You can choose your desired professional theme from the LeadCenter.ai Website Builder range of themes and create an exceptional website for your business needs.
Creating Pages
LeadCenter.AI Website Builder helps you create pages for your website in no time. You can create pages for your website and customize them as per your requirement.
Customizing Header & Footer
LeadCenter.ai Website Builder lets you customize the header and footer of your website by changing an icon, link, and text, etc.
Creating Forms
You can create Quotation forms that are supported by LeadCenter.AI, they are Modal Form and Inline Form. See How to Create and Build Forms to build quotation forms.
Adding Blogs
Blogs are also an important part of your website. Each blog you share tells a story about your brand.
Advanced Appearance Settings
It provides advanced appearance setting options which allow you to customize the appearance of your website.
Advanced Styling: It lets you choose a style for your website from a list of advanced styles.
Advanced Typography: It lets you choose typography from a list of professional typography options.
Advanced Coloring: It let you choose from a range of color options to design your website. It offers primary and secondary color options, the two colors which enhance the color and design of your website.
Advanced Coding: It also comes with an advanced coding option, that lets you independently operate your website in the future with minimal support.


 Make sure to delete any A or CNAME records that will conflict with the new records. It is recommended to take a snapshot of those records before you delete them.