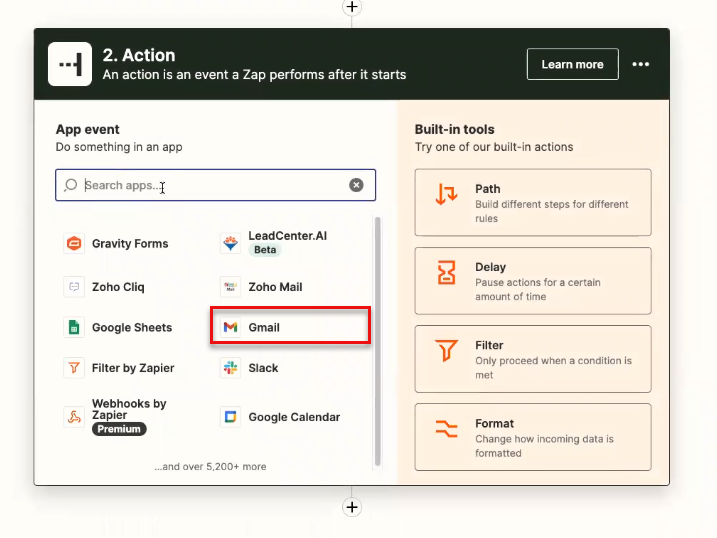
In the Actions operation, Choose and enter an app (For example; Gmail) For example; if want to push the lead to Gmail.
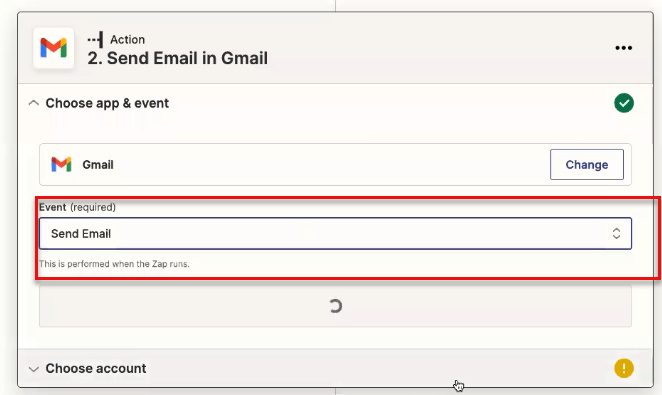
Enter an event, that will be performed when the Zap runs
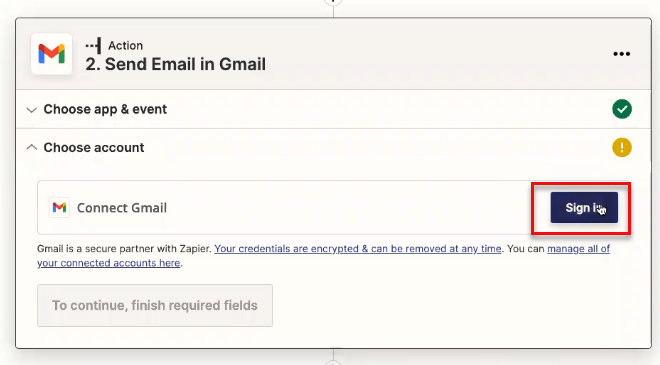
Connect to your Gmail to Sign In to your Google account and click Continue.
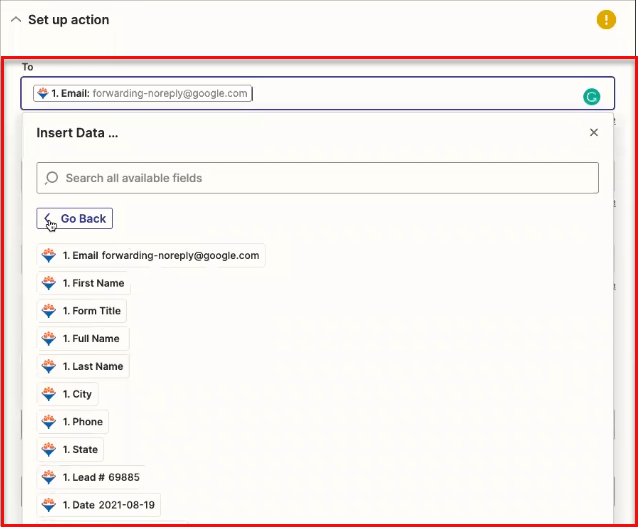
In the Set Up Action, map the required fields to prepare the email body and click Continue.
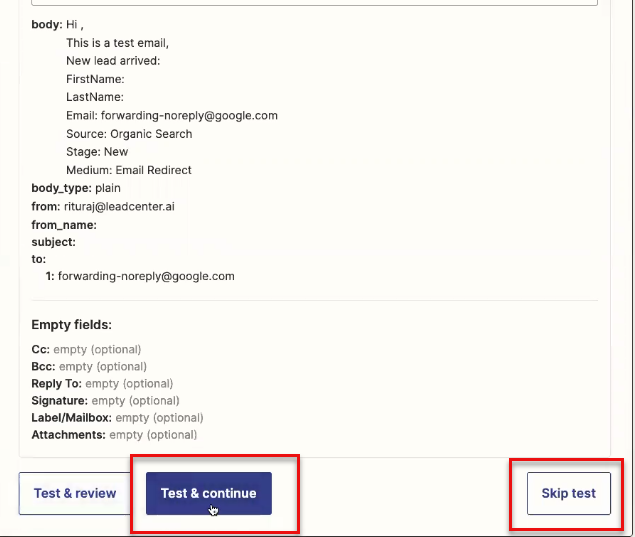
Click Test & Continue button OR Skip Test button.
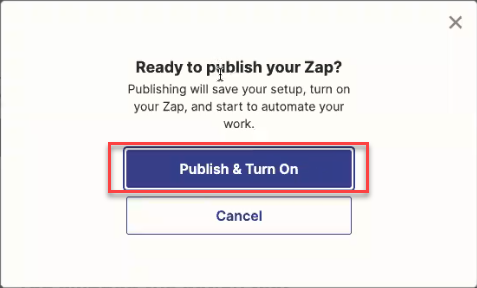
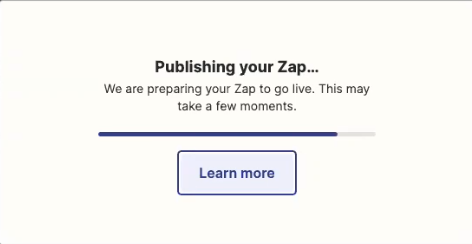
To publish Zap, click on Publish Zap> Publish & Turn On button. The Zap will be published.
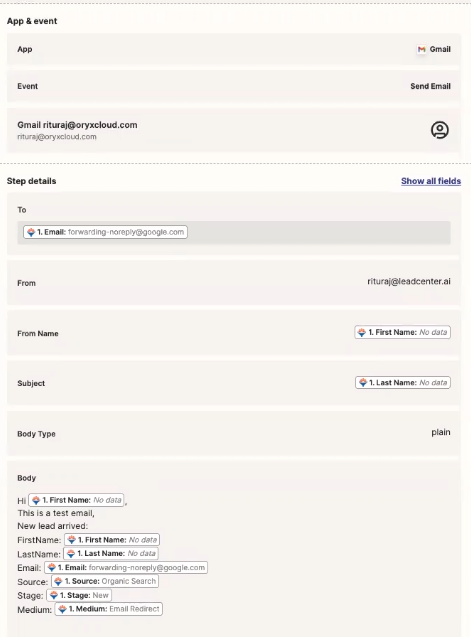
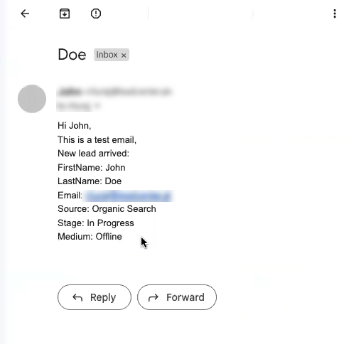
The Email Format in Zap: The Email format(When a new lead is created an email will be received in your configured Gmail account) in the below format: You have successfully pushed leads to Zapier.
LeadCenter provides you the ability to integrate LeadCenter Calendars with Redtail CRM calendars. To enable the integration, follow these steps:
On LeadCenter.AI, click on Appointments on the left menu
2. Click on the Switch Calendar button in the upper right corner and select the calendar that you want to connect to the Redtail calendar
3. Click on the setup button (gearbox) in the upper right corner
4. Scroll down to the bottom of the page until you reach Step 5, Connect Your Accounts
5. The Login to Redtail CRM dialog is displayed. Click on the Connect button
6. Enter your Redtail CRM Username, Password and click on the Connect button. This will sync your calendar in LeadCenter with the Redtail CRM calendar.
Hint: Connecting one user calendar will NOT connect the calendar for all users. each user must do the same steps for her\his own calendar.
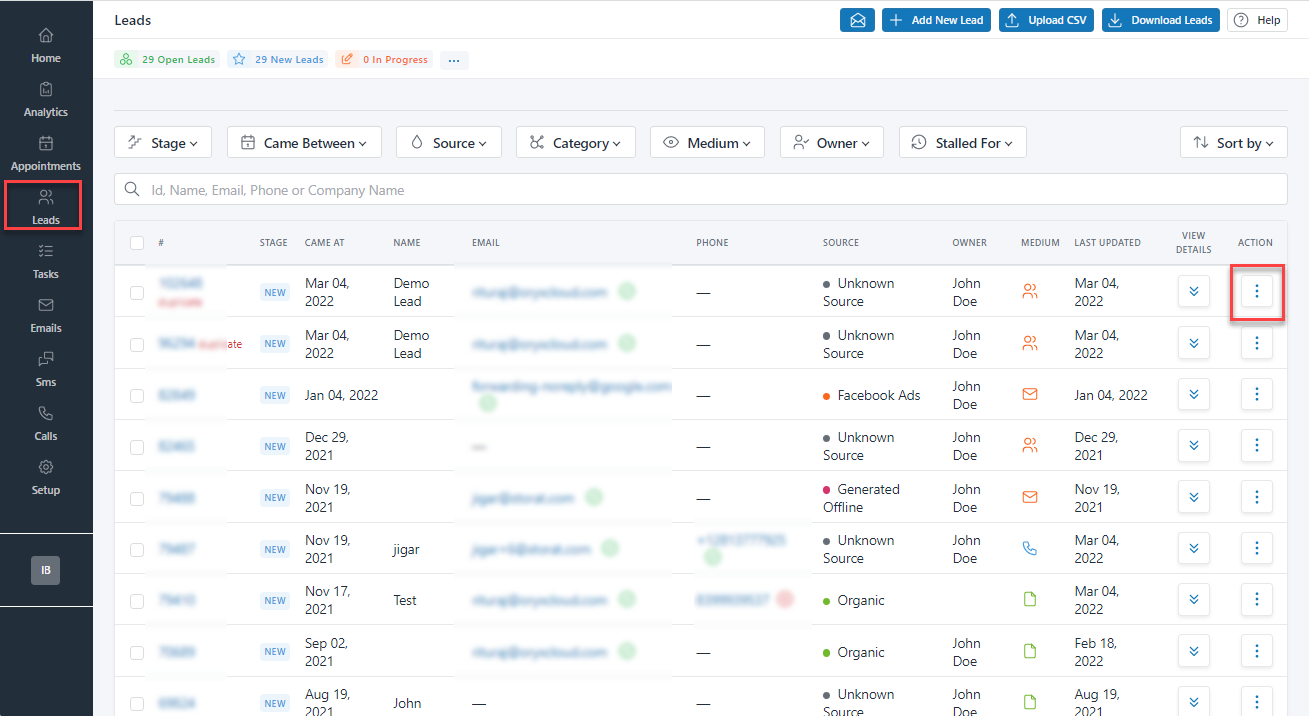
To push leads to Redtail as contacts, do the following:
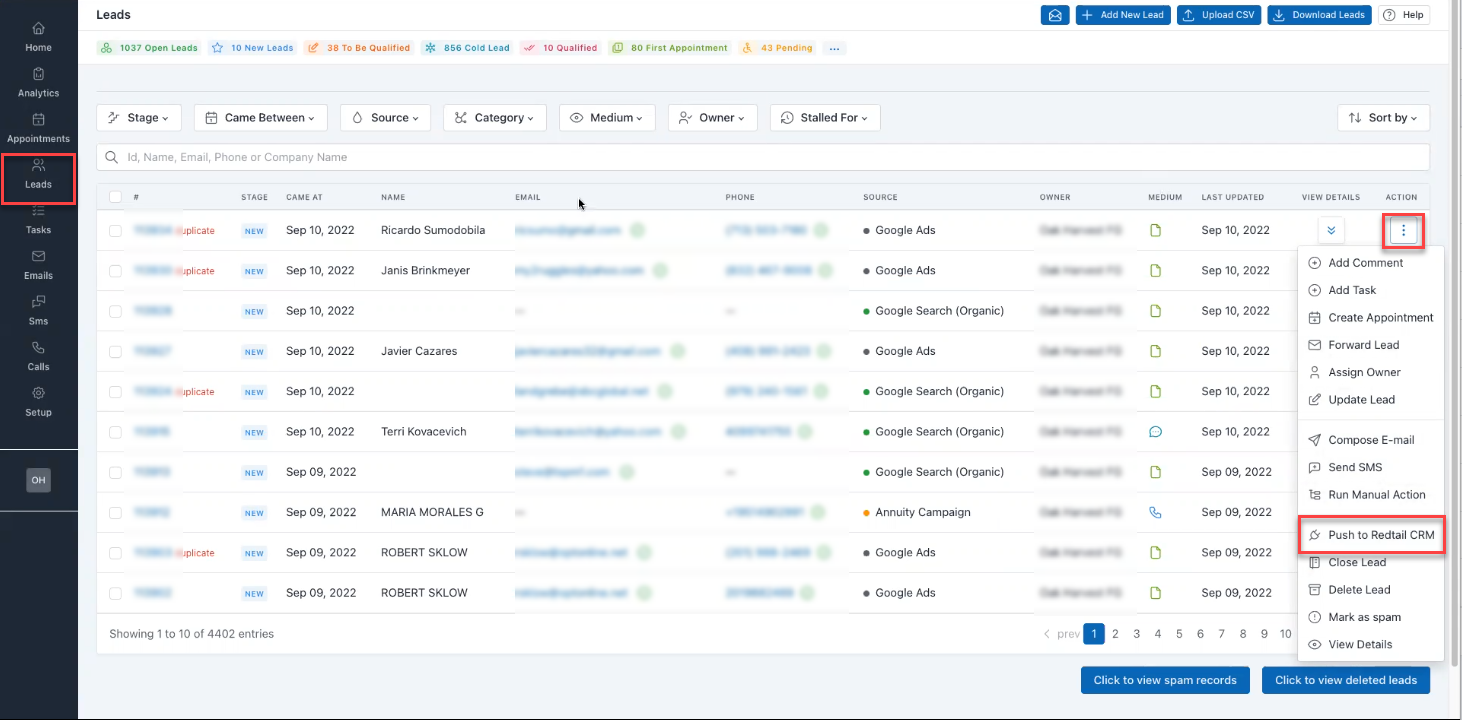
Click on the three dots under the Action column. The Action drop-down list will be displayed.
Click Push to Redtail CRM, to push the contacts Once you click the Push to Redtail CRM button, the job will start to push the lead as a new Individual contact. The push will be queued as a job. It will take a few minutes to create the contact, depending on the number of fields being pushed. Once the job is completed, you will receive an email notification.
Note :
If you mapped the Company field, the system will look up if the company exists in Redtail. If it does not exist, it will create a new business contact for that company. If you do not wish to create new companies in Redtail, please do not map the company field.
If you mapped the Spouse fields, the system will also create a new individual contact for the Spouse and link it to the new contact as a spouse.
Redtail CRM is a web-based system that enables financial professionals to manage prospects and clients. You can push leads from Oryx Cloud to Redtail CRM as contacts.
The Lead Capturing software captures leads by Phone, Forms, chat, and Email, and pushes them to Redtail CRM as a Contact.
Setting up the Integration
To set up the integration, users will need to enable the integration with Redtail within your LeadCenter.AI Account.
To enable the integration, do the following:
On the LeadCenter.AI, go to Setup > Integration All the LeadCentre.AI, related integrations are displayed.
On the REDTAIL section, click on Connect button
In the login to Redtail CRM dialog box, enter your Username and Password and click on Connect button. The user should have a Redtail account.
Once the integration is successful, a message will be displayed, “Successfully connected to Redtail CRM. Configure the contact fields mapping to start pushing leads as contacts”.
The Redtail CRM and LeadCenter.AI Lead Capturing accounts are connected. The next step is to map the fields between leads in LeadCenter.AI and Contacts in Redtail.
Mapping Fields
Once the LeadCenter.AI connection to Redtail is established and you have created all the additional custom fields you like to push to Redtail contacts, the next step is to map lead fields in LeadCenter.AI to Redtail CRM fields. To accomplish this, click on the Configure button in the Redtail box in LeadCenter.AI.
The mapping screen has all Redtails fields available to push data to. LeadCenter.AI lead fields will be available from the drop-down box of each Redtail Field.
On the REDTAIL section, click on Configure button. The Configure Redtail Integration page is displayed. This is where you can map Redtail contact fields to LeadCenter.AI lead fields.
On the New Individual section, click on the First drop-down list. Here, for example, we are mapping Redtail contact first name field to LeadCenter.AI lead first.
Here, search for the First Name and select it from the list. The First Name in LeadCenter.AI is mapped to First Name in Redtail. When you push a lead from LeadCenter.AI to Redtail CRM, those fields will map together and the first name of the lead in LeadCenter.AI will be transferred to Redtail Contact First Name. If you cannot find the field you want to map in the drop-down, you should create it first as a custom field in LeadCenter.AI. For more information about creating Custom Fields in LeadCenter.AI, see How to Create Custom Fields. Note: When creating custom fields, make sure to create the correct custom field type and the data type will map accurately to the Redtail contact field type and data type.
Click on Save Changes, once all the fields are mapped.
Pushing Leads to Redtail as Contacts
To push leads to Redtail as contacts, do the following:
Click on the three dots under the Action column. The Action drop-down list will be displayed.
Click Push to Redtail CRM, to push the contacts Once you click the Push to Redtail CRM button, the job will start to push the lead as a new Individual contact. The push will be queued as a job. It will take a few minutes to create the contact, depending on the number of fields being pushed. Once the job is completed, you will receive an email notification.
Note :
If you mapped the Company field, the system will look up if the company exists in Redtail. If it does not exist, it will create a new business contact for that company. If you do not wish to create new companies in Redtail, please do not map the company field.
If you mapped the Spouse fields, the system will also create a new individual contact for the Spouse and link it to the new contact as a spouse.
If you mapped the Company field, the system will look up if the company exists in Redtail. If it does not exist, it will create a new business contact for that company. If you do not wish to create new companies in Redtail, please do not map the company field.
If you mapped the Spouse fields, the system will also create a new individual contact for the Spouse and link it to the new contact as a spouse.
LeadCentre.AI integrates with Zapier to push leads to other CRM using Zapier. To integrate with Zapier, you need to generate an access token from the LeadCentre.AI user interface.
Configuring Zapier to push leads
To configure Zapier, do the following:
Log in to your Zapier Account The Trigger dialog box is displayed.
In the Trigger operation, do the following;
Choose and enter the app name for example; LeadCenter.AI
Enter the Event from the drop-down list and click Continue.
To create a new account, click on Connect a new account. The Allow Zapier to access your LeadCenter.AI Account? page is displayed.
Go to the LeadCentre.AI account and copy the newly generated access token. For more details to generate an access token, see “Configuring Access Token”.
Enter the token access number and click Yes, Continue. The LeadCentre.AI account is connected.
The Test your Trigger page is displayed.
To test the trigger click on Test Trigger. If a new lead is found it will be displayed.
Click Continue The Action dialog box is displayed to push leads. For more details to push leads, see Pushing Leads through Zapier.
Zapier is an online platform that helps you automate workflows by connecting the apps and services you use. This allows you to automate tasks without having to build this integration yourself, or hiring someone to build this integration for you.
LeadCentre.AI integrates with Zapier to push leads to other CRM using Zapier. To integrate with Zapier, you need to generate an access token from the LeadCentre.AI user interface.
Zapier access tokens are the thing that Zapier can use to make requests to LeadCenter.AI. It will allow Zapier to connect with LeadCenter.AI and access your leads on your behalf of you.
Configuring Access Token
To configure the access token, do the following:
On the LeadCenter.AI, go to Setup > Integration All the LeadCentre.AI, related integrations are displayed.
On the Zapier section, click on Configure Access Tokens button. The Zapier Tokens page is displayed.
To generate the access token, click on Generate new token button.
Enter the note and click on Generate Token button. A new token will be generated.
To copy the token click on Copy Token button. Note: Ensure that you copy the access token, as you will not be able to access it later.
[OPTIONAL]To generate a new token again, click Generate new token.
Revoking Access Token
To revoke the access token, do the following:
On the LeadCenter.AI, go to Setup > Integration
On the Zapier section, click on Configure Access Tokens button.
Click on the Revoke button to revoke an access token A confirmation message will be displayed.
Click on the Revoke token button in the confirmation message to revoke the access token. A success message will be displayed.
After creating the quotation form, it will be displayed in the Forms page, where you can see the generated code for each particular quotation form. This code needs to be added in the section or page of your website, based on your requirement. For support on integrating the code contact LeadCenter.AI Support team.
To integrate the code to use the quotation forms in your website, do the following;
In LeadCenter.AI Store Manager > Website Builder > Forms page
Copy the quotation form code, that needs to be integrated into the website
Click Pages and select the page where you want to add the code
Click on Actions > Edit
For example; the Contact page is displayed.
In the left navigation panel, click on this icon and add the code wherever you want the form to display.
Scroll down the code window scroll bar and click OK.
Click on the Save Changes icon A success message will be displayed after the code is integrated. An example of the Contact Us page after integrating the code.